Thursday, 5 January 2023

App Service Plan

An app service can be thought of as the runtime environment in azure for your application, it could be an API, or a web app or a SPA (Single page application, Angular, React, Vue.js, etc). However before we can create an App Service we need an App service Plan. 

An App service plan, can be thought of as the infrastructure for your application, as in all things in life, you get what you pay for, the more expensive the app service plan the more 'Horsepower' you have, the question you must ask yourself do I need a Porche to get my groceries... the answer is generally yes if you are a god damn douche-bag... otherwise just get a ford escort.

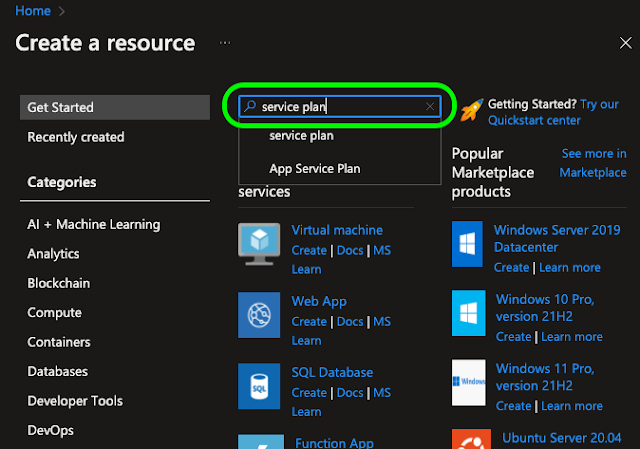
To set add a service plan to your Resource group click the 'Create a resource' button on the home screen of your azure portal.


this will bring up your 'Create a resource page, in the top search bar just search for 'Service plan'.


It should be the first search result look for 'App Service plan'


The fastest way to get started is to select the 'Create' drop down and choose 'App Service Plan', this will navigate you to the 'Create App Service Plan' page, here you'll have to specify some basic configuration.


Two things to point out, are one, to get the free tier for linux based OS you have to click the 'Explore pricing plan' link button and manually select it, and try to use a reasonable naming convention to make it easier on yourself later.

Next optionally if you like you can hit 'Next: Tags >' to add tags to your 'App Service Plan' unless you have 100 of resources, this may be a bit overkill. Just keep in mind like all things, before adding tags you should come up with a tagging strategy something that is repeatable and beneficial.

Whether you choose to add tags or not the final step is to click the 'Review + create' button.


Here you just do a final sanity check of what you are about to deploy, make sure your spelling is right, the pricing tier is correct, and create your application.

Once your plan is deployed, you can navigate to your resource group that you created earlier and do one last double check to make sure it is where you expect it to be.


And that's it, our App service plan is ready to go.

So that is all fine and dandy, however I generally prefer to use powershell to deploy all my infrastructure, hence the following 


# Create app service plan
function CreateAppServicePlan {
Param(
[Parameter(Mandatory=$true)] [String] $name,
[Parameter(Mandatory=$true)] [String] $location,
[Parameter(Mandatory=$true)] [String] $environment)
$rgName = "rg-$name-$environment"
$planName = "plan-$name-$environment"
Write-Host "Createing $planName ($location) app service plan in $rgName resource group" -ForegroundColor Magenta
#check if service plan already exists
$servicePlan = Get-AzAppServicePlan -ResourceGroupName $rgName -Name $planName -ErrorAction SilentlyContinue
if($servicePlan){
Write-host "App service already exists " -foregroundcolor yellow
return $servicePlan
}
#create service plan
try{
$servicePlan = New-AzAppServicePlan -ResourceGroupName $rgName -Name $planName
                                            -Location $location -Tier 'Free'
                                            -NumberofWorkers 1 -WorkerSize 'small'

Write-host "App service plan Created" -foregroundcolor Green
return $servicePlan
}
catch{
Write-error "App service plan NOT created: $Error[0]" -ErrorAction Stop
}
}


# these guids will be unique to your Azure tenant and subscription
# fyi these are randomly generated and not my actual guids
$tenantId = "ba9ff786-e26a-4a09-ac62-412a0d1f1d76"
$subId = "d8cddcf7-1050-4524-89e3-28cea221fd80"

$azContext = Get-AzContext

if(!$azContext){
Connect-AzAccount -Tenant $tenantId -SubscriptionId $subId -UseDeviceAuthentication
}

#create service plan
$servicePlan = CreateAppServicePlan -name pav-example -location westeurope -environment dev

# Disconnect active account
Disconnect-AzAccount

One caveat, by default the PowerShell command 'New-AzAppServicePlan' will create a Windows based app service plan, according to the documentation on MSDN, by appending the -Linux switch this should not be the case, however when I tried it, I kept getting an "A parameter cannot be found that matches parameter name 'Linux'" exception, kind of a pain in the arse, one day I hope to come back and figure that out.

Wednesday, 4 January 2023

Resource groups

Before we can configure just about anything in azure we need to create a 'Resource group' to hold our 'stuff'. If your are wondering what a resource group is in azure, you can think of it as a logical container for resources linked with your subscription. Basically it's a way to organise the things out deploy, those could be virtual machines, storage accounts, virtual networks, app services, app service plans, blob storage, etc. Basically any resource within azure must be stored within a resource group. One caveat is Azure services, they generally run at the subscription level, which is more ore less the thing you pay for.

To setup a resource group is pretty simple, log into your azure portal, and click the resource groups icon

you should see something like the following
I've blacked a few things out, for no particular reason, all of those details would be different for you anyway, the important thing is to click the create button.
once you've filled out all the mandatory details, you can add some tags if you like, this could prove useful especially if you are managing lots of resource groups and would like an easy way to filter them by, however you can always do it later... which is my favourite time to think of new key value pairs. 

Rather than expend mental energy thinking of good contrived tags, we're just gonna go ahead and create our resource group.
Let's click the 'Create' button and see what happens.... Shockingly, there's a resource group now listed with the name we provided.
We have our resource group, now that is good and dandy, now personally I prefer to script the creation of my Azure resources, so rather than going through the UI I can run a powershell script and create everything that I need. This way if i mess something up, I can just delete everything and start over. 


#create resource group
function CreateResourceGroup {
Param(
[Parameter(Mandatory=$true)][String]$name,
[Parameter(Mandatory=$true)][String]$location,
[Parameter(Mandatory=$true)][String]$environment)
$rgName = "rg-$name-$environment"
#check if resource group already exists
$resourceGroup = Get-AzResourceGroup -Name $rgName -ErrorAction SilentlyContinue
if($resourceGroup){
Write-host "Resource group already exists" -foregroundcolor yellow
return
}

#create resource group
Write-Host "Createing $rgName resource group in $location" -foregroundcolor magenta
Write-Host "With tags [application = $name; environment = $environment]" -foregroundcolor magenta
try {
$resourceGroup = New-AzResourceGroup -Name $rgName -Location $location -Tag @{Application=$name; Environment=$environment}
Write-host "Resource group created" -foregroundcolor green
write-host $resourceGroup
return
}
catch {
#failed to create resource group
Write-error "Resource group NOT created" -ErrorAction Stop
throw
}
}

# these guids will be unique to your Azure tenant and subscription
# fyi these are randomly generated and not my actual guids
$tenantId = "ba9ff786-e26a-4a09-ac62-412a0d1f1d76"
$subId = "d8cddcf7-1050-4524-89e3-28cea221fd80"

$azContext = Get-AzContext

if(!$azContext){
Connect-AzAccount -Tenant $tenantId -SubscriptionId $subId
}

# create resource group
CreateResourceGroup -name pav-example4 -location westeurope -environment dev

# Disconnect active account
Disconnect-AzAccount


this is the way I prefer to automate my deployments, there are other methods, namely config files you can use, and maybe one day I'll take the time to learn them.


Monday, 12 December 2022

Mac: Set command alias

On all my computers I like to set up a dedicated drive where I keep my development work, often time's I find myself navigating through the command line to get to my dev drive, it's nothing crazy 

cd /Volumes/dev


however I prefer to have something a long the lines of 'gotodev' because I switch between my windows work pc and my home Mac it's just one of those little nice to haves.


On a Mac to set up a path alias, open up a new terminal and you should start your journey in your home directory, which is great, cause that is exactly where you want to be.


type in the command


ls .zshrc 


if nothing comes up then you need to create it, simply type in


touch .szhrc 


this will create a .zshrc file in your home directory

Next you are going to have to open it with the command


nano .zshrc


this will open your .zshrc file in a terminal text editor, and add the following line


alias gotodev='cd /Volumes/dev'


the result should look something like the following


Once you have added your alias exit the editor and make Sure you save your changes, and from now one when you type in 'gotodev' in your terminal you should be navigated to '/Volumes/dev'


to test out out your command hit commad+t to tab open a new command window and type in 'gotodev'

Wednesday, 16 November 2022

NavMesh 02

Continuing from where we left off in our last post,  we had a very simple 'Plane' game object and a 'Player' game object that could move around our plane. Now let's create some obstacles for our 'Player' game object to circumnavigate.

But before we get started let's increase the size of our plane, try doubling it for now

All I did was increase the X and Z scale to 2, doubling our planes Surface area, you may also notice that I've shrunk our sphere to 0.5; In way quadrupling our surface area (don't quote me on the math there).

Let's give our plane some girth, add a cube as a sub object of the plane, make it roughly the same size or even a little bigger and position it directly underneath our plane.

I've selected the plane to highlight the borders.

Now let's create a 'FollowPlayer.cs' Script in our Scripts folder, this will move our camera with our 'Player' Game Object.

using UnityEngine;

public class FollowPlayer : MonoBehaviour
{
    //reference to the player game object
    public GameObject Player;

    //reference to camera Z start point
    private float cameraZ;

    void Start(){
        // save the cameras initial Z point
        this.cameraZ = this.transform.position.z;
    }
    void LateUpdate()
    {
        var x = this.transform.position.x;
        var y = this.transform.position.y;
        //Maintain consistent z distance between Camera & Player
        var z = Player.transform.position.z + cameraZ;

        //update camera position.
        var newCameraPos = new Vector3(x, y, z);
        this.transform.position = newCameraPos;

        //rotate camera to look at the player
        this.transform.LookAt(Player.transform);
    }
}

Once your script is complete we're going to add it to our 'Main Camera' game object.

Next add a reference to our 'Player' game object inside our 'Follow Player' script. With our Script attached to our 'Main Camera' open the Camera component and change the 'Clear Flags' property to solid color and set that color to black or an off black color.

Let's bake our our NavMesh again to update it with our new size change, Select the 'NavMesh' Game Object from our Hierarchy and in the Inspector click the 'Bake' button.

Now hit play and try out our little game, it should look something like this.

now let's build some obstacles, create an empty Game Object and call it obstacles, we're just doing this to group our GameObjects in our Hierarchy so that it doesn't get too cluttered.


I created four cubes and scaled them to different sizes and placed them around the plane, now there positioning isn't too important just that there's enough room for our ball to move between them. 

You may have noticed that white on white white is proving to be pretty difficult to keep track of, let's add some colour to our world, let's create a new folder called Materials and add a material called 'DarkGreen'


Select Your new 'DarkGreen' Material and set its color to hot pink, no wait I mean dark green, just like you did for the Camera background earlier.


with that complete, create colours for obstacles, player and the plane base, we'll use dark green for our Plane.


with all of our colours defined, you can either drag and drop the materials onto the Objects you want them to be applied to. Now if you click play again after you've applied all your materials you should see something like the following.


Great except for the part where our Player is moving through obstacles, but let's fix that, exit play mode and select our 'NavMesh' GameObject in our Hierarchy and again click the 'Bake' button.

Let's play our game again.

better than last time, at least our player isn't moving through our obstacles, but it's still not going around them. We have basically three options to force our player to move around our Obstacles.
  1. Add a 'NavMeshModifier' to our obstacles and flag them as not walkable.
  2. Increase the Obstacles height so that the Agent can't get over it
  3. Decrease the Agents ability to go over obstacles 
Firstly you can create a NavMeshModifier component and override the area as not walkable, to demo this click on the 'Obstacles' game object and add the 'NavMeshModifier' component.

check off the "Override Area' and select 'Not walkable', back once more and now your 'Player' should have to circumvent the obstacles as it moves to a specific position. Before we continue make sure to remove the NavMeshModifier component from our Obstacles.


The Second method the simpler in conception, select the 'NavMesh' game object and take note of the step height of our agent, once you do that just pick an obstacle and increase it's height to a value greater than the step height.


In the Third approach rather than increasing the size of the obstacle we instead decrease the agent's step value, to accomplish this we click on the Navigation panel, select the agent tab and decrease the step height to .2 and set the 'Max Slope' to 35 


then select the 'NavMesh' gameObject' in our Hierarchy make sure that you select the inspector again and click the bake button once more.


You can see that our new nav mesh forces our Player to move around our obstacles, however it allows our player to walk ontop of our thick obstacle if it can get up there.

That is enough for this post, 

Check out the code here
Play the demo here

Thursday, 10 November 2022

NavMesh 01

The NavMesh, is a 3D mesh that facilitates the movement of game objects which have the 'Nav Mesh Agent' component attached to them. 

I watched a Youtube video of a very similar example, however generally I like to start from scratch rather than a pre or half baked solution.

Let's start by Creating a brand new Unity Project from the Unity hub

Once you hit 'Create project' depending on your computer, this may be a great time to either grab a coffee or a nap.... After anywhere from 2 to 15 minutes your Empty Unity Project should be open.

Before we get started let's make sure that you have the Navigation Panel open in your project.
go to Window  -> AI ->Navigation

You can snap it anywhere within your project, I for me it just makes sense to tab it with my Inspector.

Optionally you can add the ProGrids package, via the package manager, keep in mind that currently ProGrids is an experimental package and has to be added by Name.

Some of the components that you are going to need do not ship standard with Unity, you have to explicitly add the package by name, because at this time they are 'Experimental', but you're a badass so go head and experiment. 

Open Window-> Package Manager.


With that done we can finally get started. 

Add a 'Plane' to your main hierarchy,

Next, let's create an 'Empty' GameObject in the Hierarchy and add a NavMeshSurface Component to it


Next, in your Assets folder add a 'Scripts' folder and in that freshly created 'Scripts' folder create a PlayerController.cs script.


You'll have to rename it from the default 'NewBehaviourScript.cs' name. Open your script, in your preferred IDE, personally I use MS Code. paste in the following code

//added UnityEngine namespaces
using UnityEngine;
using UnityEngine.AI;
public class PlayerController : MonoBehaviour
{
    //reference of the camera to know what the user clicked on
    public Camera Camera;

    //reference to the thing that will move
    public NavMeshAgent Agent;

    //Create an enum for mouse buttons
    enum MouseButton{ Left = 0, Right = 1, Scroll = 3 }

    // Update is called once per frame
    void Update()
    {
        //check if the user left clicked on something
        if(Input.GetMouseButtonDown((int)MouseButton.Left)){
            //what did the user click on
            RaycastHit hit;
           
            //where did the user click on the screen
            var pos = Input.mousePosition;

            //where from the camera's perspective did the user click
            var ray = Camera.ScreenPointToRay(pos);

            //did the user click on an object
            if(Physics.Raycast(ray, out hit))
                //send the agent to the point the user clicked on
                Agent.SetDestination(hit.point);
        }
    }
}

The above code figures out what did the user click on and tells the agent to go there.

Now we are going to add our PlayerController.cs Script to an 'Empty' game object in our Hierarchy, right click in the Hierarchy and select the 'Create Empty' option.


Once you have created your Empty game Object make sure to add our new Player Controller Script to the 'PlayerController' Game Object. 

While we are add it let's add the reference to our Main Camera, click the little circle next to our camera input and select the main Camera.


with our camera reference added, it seems that we now need to create an agent; for simplicity sake let's add a Sphere to our hierarchy and name it Player. Select your Player game object and hit the 'F' key on your keyboard, this will bring it into focus, make sure that you position it above your plane.


Keep in mind that your position values may be different from mine, all you want to do, is make sure that your 'Player' game object is above the plane. Now we are going to add the 'Nav Mesh Agent' component to your 'Player' game object, as before select the 'Player' game object click the add component button in the inspector and select 'Nav Mesh Agent'.


With our 'Nav Mesh Agent' component added to our 'Player' game object we can now reference it in our 'Player Controller' game object. Select the player controller and like we did with the Camera reference our Player.


We now have one final step before the super cool step of a moving ball, click on the 'NavMesh' game object we created earlier in the hierarchy and click the 'Bake' button.


Notice the light blue added to our Plane, this is the movable area by our 'Agent' now if you click Play button we can click anywhere on our plane and move our 'Player' game object to that location. 

Test out the demo here
Check out the Source here

Thursday, 3 November 2022

Progrids Unity add in

Progrids is a unity package that let's you set up a 3d grid snapping, that is you can set the value that you want your assets to snap to, it's extremely helpful when setting up your level. you can read about it here:
About ProGrids | ProGrids | 3.0.3-preview.6 (unity3d.com)

However currently adding it to your project is not very straightforward, it's in prelease and does not come up in unity registry under the package name, the easiest way is to add it by name.

Go to top menu select Window-> Package Manager

with your package manager open in the top left corner click, the little plus sign and select add package by name or from git URL.


Next type in com.unity.progrids and hit the add button


and that's it you'll have successfully added progrids to you project.

Tuesday, 1 November 2022

Unity Coroutine

Let's say that you want to run some asynchronous task after a timer of some sort, then the StartCoroutine method is your friend, with a very set it and forget it approach.

    // Start is called before the first frame update
    void Start()
    {
        StartCoroutine("doSomethingAfter3seconds");
        StartCoroutine("doSomethingAfter5seconds", "Say hi");
    }


     IEnumerator doSomethingAfter3seconds(){
        yield return new WaitForSeconds(3);
        Debug.Log("it's been 3 seconds");
    }

      IEnumerator doSomethingAfter5seconds(object value){
        yield return new WaitForSeconds(5);
        Debug.Log($"it's been 5 seconds, {value}");
    }

And that's all there is to it, there's also controller function. that will let you stop your coroutine or stop all coroutines.

StopCoroutine("doSomethingAfter3seconds");
StopAllCoroutines();