An app service can be thought of as the runtime environment in azure for your application, it could be an API, or a web app or a SPA (Single page application, Angular, React, Vue.js, etc). However before we can create an App Service we need an App service Plan.
An App service plan, can be thought of as the infrastructure for your application, as in all things in life, you get what you pay for, the more expensive the app service plan the more 'Horsepower' you have, the question you must ask yourself do I need a Porche to get my groceries... the answer is generally yes if you are a god damn douche-bag... otherwise just get a ford escort.
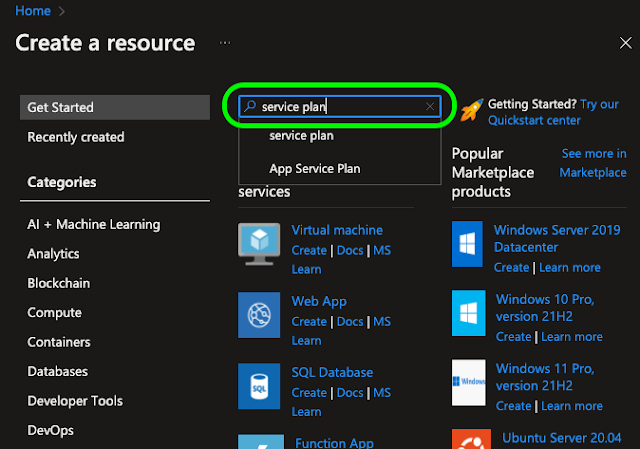
To set add a service plan to your Resource group click the 'Create a resource' button on the home screen of your azure portal.
this will bring up your 'Create a resource page, in the top search bar just search for 'Service plan'.
It should be the first search result look for 'App Service plan'
The fastest way to get started is to select the 'Create' drop down and choose 'App Service Plan', this will navigate you to the 'Create App Service Plan' page, here you'll have to specify some basic configuration.
Two things to point out, are one, to get the free tier for linux based OS you have to click the 'Explore pricing plan' link button and manually select it, and try to use a reasonable naming convention to make it easier on yourself later.
Next optionally if you like you can hit 'Next: Tags >' to add tags to your 'App Service Plan' unless you have 100 of resources, this may be a bit overkill. Just keep in mind like all things, before adding tags you should come up with a tagging strategy something that is repeatable and beneficial.
Whether you choose to add tags or not the final step is to click the 'Review + create' button.
Here you just do a final sanity check of what you are about to deploy, make sure your spelling is right, the pricing tier is correct, and create your application.
Once your plan is deployed, you can navigate to your resource group that you created earlier and do one last double check to make sure it is where you expect it to be.
And that's it, our App service plan is ready to go.
So that is all fine and dandy, however I generally prefer to use powershell to deploy all my infrastructure, hence the following
# Create app service plan
function CreateAppServicePlan {
Param(
[Parameter(Mandatory=$true)] [String] $name,
[Parameter(Mandatory=$true)] [String] $location,
[Parameter(Mandatory=$true)] [String] $environment)
$rgName = "rg-$name-$environment"
$planName = "plan-$name-$environment"
Write-Host "Createing $planName ($location) app service plan in $rgName resource group" -ForegroundColor Magenta
#check if service plan already exists
$servicePlan = Get-AzAppServicePlan -ResourceGroupName $rgName -Name $planName -ErrorAction SilentlyContinue
if($servicePlan){
Write-host "App service already exists " -foregroundcolor yellow
return $servicePlan
}
#create service plan
try{
$servicePlan = New-AzAppServicePlan -ResourceGroupName $rgName -Name $planName
-Location $location -Tier 'Free'
-NumberofWorkers 1 -WorkerSize 'small'
Write-host "App service plan Created" -foregroundcolor Green
return $servicePlan
}
catch{
Write-error "App service plan NOT created: $Error[0]" -ErrorAction Stop
}
}
# these guids will be unique to your Azure tenant and subscription
# fyi these are randomly generated and not my actual guids
$tenantId = "ba9ff786-e26a-4a09-ac62-412a0d1f1d76"
$subId = "d8cddcf7-1050-4524-89e3-28cea221fd80"
$azContext = Get-AzContext
if(!$azContext){
Connect-AzAccount -Tenant $tenantId -SubscriptionId $subId -UseDeviceAuthentication
}
#create service plan
$servicePlan = CreateAppServicePlan -name pav-example -location westeurope -environment dev
# Disconnect active account
Disconnect-AzAccount
One caveat, by default the PowerShell command 'New-AzAppServicePlan' will create a Windows based app service plan, according to the documentation on MSDN, by appending the -Linux switch this should not be the case, however when I tried it, I kept getting an "A parameter cannot be found that matches parameter name 'Linux'" exception, kind of a pain in the arse, one day I hope to come back and figure that out.