Showing posts with label azure. Show all posts

Saturday, 7 January 2023

Blob Storage Info

Azure Blob storage is Microsoft's object storage solution for the cloud. Blob storage is optimized for storing massive amounts of unstructured data. Unstructured data is data that does not adhere to a particular data model or definition, such as text or binary data. It is ideal for flat-files, images, videos and sound files.

Though there are four types of Blob storage types: Standard general, Premium block blobs, Premium page blobs, and Premium file shares; odds are you are going to need the standard general.

Storage account type Supported storage services Usage
Standard general-purpose v2 Blob, Queue, and Table storage, Azure Files Standard storage account type for blobs, file shares, queues, and tables. Recommended for most scenarios using Azure Storage. If you want support for NFS file shares in Azure Files, use the premium file shares account type.
Premium block blobs Blob storage Premium storage account type for block blobs and append blobs. Recommended for scenarios with high transactions rates, or scenarios that use smaller objects or require consistently low storage latency.
Premium page blobs Page blobs only Premium storage account type for page blobs only.
Premium file shares Azure Files Premium storage account type for file shares only.

Each of the types has 3 tiers of access:

  • The Hot access tier, which is optimized for frequent access of objects in the storage account. The Hot tier has the highest storage costs, but the lowest access costs. New storage accounts are created in the hot tier by default.
  • The Cool access tier, which is optimized for storing large amounts of data that is infrequently accessed and stored for at least 30 days. The Cool tier has lower storage costs and higher access costs compared to the Hot tier.
  • The Archive tier, which is available only for individual block blobs. The archive tier is optimized for data that can tolerate several hours of retrieval latency and will remain in the Archive tier for at least 180 days. The archive tier is the most cost-effective option for storing data, but accessing that data is more expensive than accessing data in the hot or cool tiers.
In all likelihood, the Hot access tier will be the most appropriate.

When accessing your blobs, there are basically levels of organisation:
  • Storage account: this is the url level, each storage account has their own unique URL, and it will look like "http://foobar.blob.core.windows.net", this is the top level url your blobs will sit at.
  • Container within the storage account, it can be thought of as a folder, you can have any number of them, but should probably ensure that they make some sort of sense, they can also be used to restrict access using permissions, so you may have one for flat files that's secured, but one for media that's public
    • http://foobar.blob.core.windows.net/data
    • http://foobar.blob.core.windows.net/images 
  • Blobs: the actual files you are storing inside your containers.

sdf

Friday, 6 January 2023

Web App Service

Now that we have our Resource group and App service plans set up, let's create a Web App service. A web app service can contain either a traditional web application such as on made using html or an API.

It's pretty straight forward, this time go to your resource group and create the 'Web App service' from there.


Then, as before select the create drop down at the bottom of the web app card and choose new 'web app'


Now this configuration is a bit more complicated


to select the previous plan that we created, our OS and region have to match, in our previous post we configured it to be west Europe and Windows at least in the PowerShell, these two properties filter which App service plans we can connect our web app service two, meaning that an App service and it's plan must be of the same OS type as well as in the same geographic region, however they do not have to be in the same resource group.

Before we create our application, go to the monitoring tab, this is because, by default app-insights is enabled, though this can be a useful service, it can also be a pricy one depending on your app usage, so I generally disable it.


Next, click the 'Review + create' button where you do one last final sanity check, make sure your spelling and naming conventions are correct and that you have the right plan connected to your web app, double check that cause it can prove to be an expensive mistake.


Now if we create our 'Web app service' we should see it in our resource group along with our app service plan (Assuming the app service plan is in the same resource, generally I like to distinguish between my environments by resource groups). 

With that done, as aways it's PowerShell time.


# create app service
function CreateAppService {
Param(
[Parameter(Mandatory = $true)] [String] $name,
[Parameter(Mandatory = $true)] [String] $prefix,
[Parameter(Mandatory = $true)] [String] $location,
[Parameter(Mandatory = $true)] [String] $environment,
[Parameter(Mandatory = $false)] [Microsoft.Azure.Management.WebSites.Models.AppServicePlan] $servicePlan,
[Parameter(Mandatory = $false)] [String] $servicePlanName)
$rgName = "rg-$name-$environment"
$appName = "app-$prefix-$name-$environment"
Write-Host "Createing $appName web app in $rgName resource group" -ForegroundColor Magenta
#check if web app already exists
$webApp = Get-AzWebApp -ResourceGroupName $rgName -Name $appName -ErrorAction SilentlyContinue
if ($webApp) {
Write-host "Web app ""$appName"" already exists" -foregroundcolor yellow
return $webApp
}
#create web app
try {
if ($servicePlan) {
$servicePlanName = $servicePlan.Name
}
$webApp = New-AzWebApp -ResourceGroupName $rgName -Name $appName -Location $location -AppServicePlan $servicePlanName
Write-host "App service ""$appName"" Created" -foregroundcolor Green
return $webApp
}
catch {
Write-error "App service NOT created" -ErrorAction Stop
}
}

# these guids will be unique to your Azure tenant and subscription
# fyi these are randomly generated and not my actual guids
$tenantId = "ba9ff786-e26a-4a09-ac62-412a0d1f1d76"
$subId = "d8cddcf7-1050-4524-89e3-28cea221fd80"

$azContext = Get-AzContext

if (!$azContext) {
Connect-AzAccount -Tenant $tenantId -SubscriptionId $subId -UseDeviceAuthentication
}

# create resource group
CreateAppService -name pav-example -prefix api -location westeurope -environment dev -servicePlanName plan-pav-example-dev

# Disconnect active account
Disconnect-AzAccount


Thursday, 5 January 2023

App Service Plan

An app service can be thought of as the runtime environment in azure for your application, it could be an API, or a web app or a SPA (Single page application, Angular, React, Vue.js, etc). However before we can create an App Service we need an App service Plan. 

An App service plan, can be thought of as the infrastructure for your application, as in all things in life, you get what you pay for, the more expensive the app service plan the more 'Horsepower' you have, the question you must ask yourself do I need a Porche to get my groceries... the answer is generally yes if you are a god damn douche-bag... otherwise just get a ford escort.

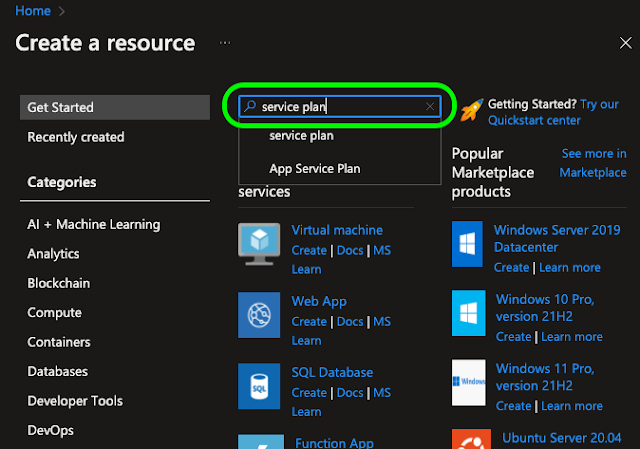
To set add a service plan to your Resource group click the 'Create a resource' button on the home screen of your azure portal.


this will bring up your 'Create a resource page, in the top search bar just search for 'Service plan'.


It should be the first search result look for 'App Service plan'


The fastest way to get started is to select the 'Create' drop down and choose 'App Service Plan', this will navigate you to the 'Create App Service Plan' page, here you'll have to specify some basic configuration.


Two things to point out, are one, to get the free tier for linux based OS you have to click the 'Explore pricing plan' link button and manually select it, and try to use a reasonable naming convention to make it easier on yourself later.

Next optionally if you like you can hit 'Next: Tags >' to add tags to your 'App Service Plan' unless you have 100 of resources, this may be a bit overkill. Just keep in mind like all things, before adding tags you should come up with a tagging strategy something that is repeatable and beneficial.

Whether you choose to add tags or not the final step is to click the 'Review + create' button.


Here you just do a final sanity check of what you are about to deploy, make sure your spelling is right, the pricing tier is correct, and create your application.

Once your plan is deployed, you can navigate to your resource group that you created earlier and do one last double check to make sure it is where you expect it to be.


And that's it, our App service plan is ready to go.

So that is all fine and dandy, however I generally prefer to use powershell to deploy all my infrastructure, hence the following 


# Create app service plan
function CreateAppServicePlan {
Param(
[Parameter(Mandatory=$true)] [String] $name,
[Parameter(Mandatory=$true)] [String] $location,
[Parameter(Mandatory=$true)] [String] $environment)
$rgName = "rg-$name-$environment"
$planName = "plan-$name-$environment"
Write-Host "Createing $planName ($location) app service plan in $rgName resource group" -ForegroundColor Magenta
#check if service plan already exists
$servicePlan = Get-AzAppServicePlan -ResourceGroupName $rgName -Name $planName -ErrorAction SilentlyContinue
if($servicePlan){
Write-host "App service already exists " -foregroundcolor yellow
return $servicePlan
}
#create service plan
try{
$servicePlan = New-AzAppServicePlan -ResourceGroupName $rgName -Name $planName
                                            -Location $location -Tier 'Free'
                                            -NumberofWorkers 1 -WorkerSize 'small'

Write-host "App service plan Created" -foregroundcolor Green
return $servicePlan
}
catch{
Write-error "App service plan NOT created: $Error[0]" -ErrorAction Stop
}
}


# these guids will be unique to your Azure tenant and subscription
# fyi these are randomly generated and not my actual guids
$tenantId = "ba9ff786-e26a-4a09-ac62-412a0d1f1d76"
$subId = "d8cddcf7-1050-4524-89e3-28cea221fd80"

$azContext = Get-AzContext

if(!$azContext){
Connect-AzAccount -Tenant $tenantId -SubscriptionId $subId -UseDeviceAuthentication
}

#create service plan
$servicePlan = CreateAppServicePlan -name pav-example -location westeurope -environment dev

# Disconnect active account
Disconnect-AzAccount

One caveat, by default the PowerShell command 'New-AzAppServicePlan' will create a Windows based app service plan, according to the documentation on MSDN, by appending the -Linux switch this should not be the case, however when I tried it, I kept getting an "A parameter cannot be found that matches parameter name 'Linux'" exception, kind of a pain in the arse, one day I hope to come back and figure that out.

Wednesday, 4 January 2023

Resource groups

Before we can configure just about anything in azure we need to create a 'Resource group' to hold our 'stuff'. If your are wondering what a resource group is in azure, you can think of it as a logical container for resources linked with your subscription. Basically it's a way to organise the things out deploy, those could be virtual machines, storage accounts, virtual networks, app services, app service plans, blob storage, etc. Basically any resource within azure must be stored within a resource group. One caveat is Azure services, they generally run at the subscription level, which is more ore less the thing you pay for.

To setup a resource group is pretty simple, log into your azure portal, and click the resource groups icon

you should see something like the following
I've blacked a few things out, for no particular reason, all of those details would be different for you anyway, the important thing is to click the create button.
once you've filled out all the mandatory details, you can add some tags if you like, this could prove useful especially if you are managing lots of resource groups and would like an easy way to filter them by, however you can always do it later... which is my favourite time to think of new key value pairs. 

Rather than expend mental energy thinking of good contrived tags, we're just gonna go ahead and create our resource group.
Let's click the 'Create' button and see what happens.... Shockingly, there's a resource group now listed with the name we provided.
We have our resource group, now that is good and dandy, now personally I prefer to script the creation of my Azure resources, so rather than going through the UI I can run a powershell script and create everything that I need. This way if i mess something up, I can just delete everything and start over. 


#create resource group
function CreateResourceGroup {
Param(
[Parameter(Mandatory=$true)][String]$name,
[Parameter(Mandatory=$true)][String]$location,
[Parameter(Mandatory=$true)][String]$environment)
$rgName = "rg-$name-$environment"
#check if resource group already exists
$resourceGroup = Get-AzResourceGroup -Name $rgName -ErrorAction SilentlyContinue
if($resourceGroup){
Write-host "Resource group already exists" -foregroundcolor yellow
return
}

#create resource group
Write-Host "Createing $rgName resource group in $location" -foregroundcolor magenta
Write-Host "With tags [application = $name; environment = $environment]" -foregroundcolor magenta
try {
$resourceGroup = New-AzResourceGroup -Name $rgName -Location $location -Tag @{Application=$name; Environment=$environment}
Write-host "Resource group created" -foregroundcolor green
write-host $resourceGroup
return
}
catch {
#failed to create resource group
Write-error "Resource group NOT created" -ErrorAction Stop
throw
}
}

# these guids will be unique to your Azure tenant and subscription
# fyi these are randomly generated and not my actual guids
$tenantId = "ba9ff786-e26a-4a09-ac62-412a0d1f1d76"
$subId = "d8cddcf7-1050-4524-89e3-28cea221fd80"

$azContext = Get-AzContext

if(!$azContext){
Connect-AzAccount -Tenant $tenantId -SubscriptionId $subId
}

# create resource group
CreateResourceGroup -name pav-example4 -location westeurope -environment dev

# Disconnect active account
Disconnect-AzAccount


this is the way I prefer to automate my deployments, there are other methods, namely config files you can use, and maybe one day I'll take the time to learn them.


Monday, 17 October 2022

CICD pipeline for Azure Blob storage with CDN - Part 6 Set up Continues Deployment of our Hero Images

This is more of a continuation of the previous post in which we configured our initial release pipeline and configured our Continuous Deployment trigger. In this post we are going to simply: 

  1. unzip our hero images, 
  2. then copy them over to our Blob storage 

Lets start by adding our delete content form our blob storage task.


Once you've opened the stage view start by renaming your stage to something more readable "Unzip and upload hero images"


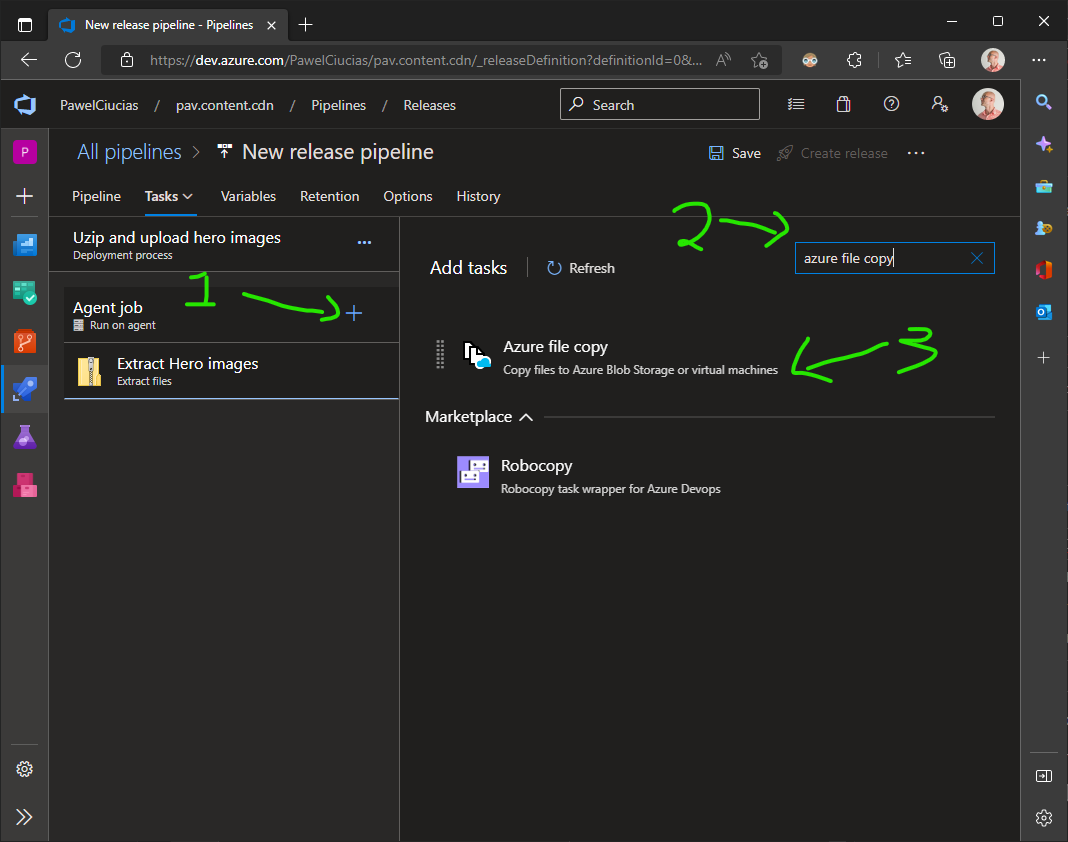
once, that's done, click the "+" to add a task to the stage, search for extract files and add the "Extract files" task


Now we are going to have to configure our extract tasks job.


There's only two things you have to do and a third nice to have,
  1. set the display name to something more meaningful.
  2. set destination path: "$(System.DefaultWorkingDirectory)/_pav.content.cdn/unzip"
  3. set Overwrite existing files to true
  4. finally click the Save button
Next let's add another task that will let us copy our hero images to our blob store, click the add task button and search for "Azure file copy"


Add the azure file copy task, here we are going to finally copy our hero images to our azure file storage.


Now set all of your File copy properties. 


save your pipeline and run it, and more likely than not your CD pipeline will fails, with the following descriptive error.


Upload to container: 'container-public-pav-master' in storage account: 'stpavmaster' with blob prefix: '' failed with error: 'AzCopy.exe exited with non-zero exit code while uploading files to blob storage.' For more info please refer to https://aka.ms/azurefilecopyreadme

my favorite parts is "AzCopy.exe exited with non-zero exit code while uploading files to blob storage", luckily for you after struggling with this for days, I learned that it's a permission issue.

Click on the gear at the bottom left and select service connections,


Click on the service connection that you are using in your pipeline.


Next click on the "Manage service Principle" link button. notice that the arrow is pointing to the wrong link button.


Take note of the display name, you're going to have to grant permissions in your azure environment to upload to your blob storage.

Next you'll have to open Access control in your azure portal for your subscription, 


This will open a drop down list, form it choose "Add role assignment" which will now let you add the Blob storage contributor role to your application service connection.


with that selected, hit the next button


Here you'll have to select the member and you'll have to manually paste in the name from a few steps above, select the member and assign the "Storage Blob Data Contributor role" this will let your dev ops site push files to your blob storage.

Now with your permissions set correctly you can create your release and you should be able to push your hero images to your Blob storage.

The blob storage URL for your images should be something along the lines of

https://stpavmaster.blob.core.windows.net/container-public-pav-master/hassan-pasha-AwssoaXCosQ-unsplash.jpg

and you should be able to access that exact same file using your cdn end point

https://cdn-endpoint-pav-master-global.azureedge.net/container-public-pav-master/hassan-pasha-AwssoaXCosQ-unsplash.jpg

and that's it, for the most part, there's two steps I'm leaving out, because I'm just too exhausted.

one you should delete all of the files in your blob storage before pushing them, to ensure that you do not host useless data.

and two you need to purge your cdn endpoint, so that your users aren't being hosted stale data.

Thursday, 13 October 2022

CICD pipeline for Azure Blob storage with CDN - Part 5 Set up Continues Deployment of our Hero Images

One of the saddest parts of Continuous Deployment is that it can't be scripted and we have to go through Microsoft anything is possible, it's just conveniently hidden behind 35 clicks and 17 modals. To get started log into your Azure Devops portal. 

Once you have to portal open click on the rocket ship and go to releases


Next click the "New pipeline" button. This will let you choose from some predefined Continuous deployment configurations, however we are going to start from a blank slate, so just choose "Empty job"


Next the we'll be prompted to start with the first stage of our continuous deployment, but before we get started, well select our artifact from our Continuous Integration pipeline, in this case the zip file in the drop folder. 

First close the stage panel, we'll get back to that later.


With the stage panel closed, click the "add artifact" area of the Artifacts section.


Now you'll be asked to choose the source pipeline, that's the YAML file we built previously, it defaults to our project name, however we could have given it a more specific name.


Once you choose your source pipeline everything else should just auto select for you.


Once you have everything selected, click the "Add" button, now that you've added your artifact (the output from the Continuous integration pipeline, the "zip" file in this case). You'll have to add the trigger for this pipeline, click the little lightning bolt.


You should be looking at the following, enable the continuous deployment trigger, and then close the panel, you could add a branch filter, but we only have a master branch in this example.


With the Continuous deployment trigger flyout panel collapsed, we're going to change the name of our Pipeline, just to make it extra clear at what it does. at the top center, click on "New release pipeline" and give it a new name' I'm calling it "Hero Image deployment pipeline" Once you've changed your Pipeline name, save your progress.


Once you click save, you'll be asked to which folder you would want to save to, for now just leave it as the root and hit the "OK" button.


That's it for now we can take a break, next we'll configure our actual pipeline.

Tuesday, 11 October 2022

CICD pipeline for Azure Blob storage with CDN - Part 4 Zip up our assets for deployment to our Blob storage.

Now that we've pushed our assets to our git repo and created our Azure infrastructure, we are now going to finish the Continuous Integration part of our DevOps pipeline. Our goal is going to be simple, zip up our assets and get them ready for deployment.

Open up your YAML file and add the following section to zip up our assets.

  - taskArchiveFiles@2
    displayName'Zip hero images'
    inputs:
      rootFolderOrFile'heroImages'
      includeRootFolderfalse
      archiveType'zip'
      archiveFile'$(Build.ArtifactStagingDirectory)/$(Build.BuildId).zip'
      replaceExistingArchivetrue

The above will simply create a zip file with the contents of our heroImages folder, if we where to check off includeRootFolder, our zip would contain the heroImages folder, but with it set to false it will simply be a build number.zip file with the contents of heroImages.

Next we have to move our Zip file to a staging area, we can do this with the following

taskPublishBuildArtifacts@1
  displayName'Publish zipped assets for deployment'
  inputs:
    PathtoPublish'$(Build.ArtifactStagingDirectory)/$(Build.BuildId).zip'
    ArtifactName'drop'
    publishLocation'Container'

The above takes our zipped file and makes it available in a folder called drop for our Continuous Deployment step, otherwise known as CD.

For good measure, here's our YAML file start to finish.

# Starter pipeline
# Start with a minimal pipeline that you can customize to build and deploy your code.
# Add steps that build, run tests, deploy, and more:
# https://aka.ms/yaml

trigger:
dev
test
master

variables:
  ${{ if startsWith(variables['Build.SourceBranch'], 'refs/heads/') }}:
    branchName$[ replace(variables['Build.SourceBranch'], 'refs/heads/', '') ]
  ${{ if startsWith(variables['Build.SourceBranch'], 'refs/pull/') }}:
    branchName$[ replace(variables['System.PullRequest.TargetBranch'], 'refs/heads/', '') ]
  name'pav'
  location'westeurope'
  azureSubscription'Pavs Subscription(0000000000-0000-0000-0000-000000000000)'

pool:
  vmImage'windows-latest'

steps
script: |
    echo BranchName = '$(branchName)'
    echo name = '$(name)'
    echo location = '$(location)'
    echo azureSubscription = '$(azureSubscription)'
  displayName'List YAML variables'

taskAzurePowerShell@5
  displayNameBuild azure cdn infrastructure
  inputs:
    azureSubscription'$(azureSubscription)'
    ScriptType'FilePath'
    ScriptPath'$(Build.SourcesDirectory)/AzureInfrastructure.ps1'
    ScriptArguments
      -location$(location)
      -name$(name)
      -env$(branchName)
    errorActionPreference'continue'
    azurePowerShellVersion'LatestVersion'
taskArchiveFiles@2
  displayName'Zip up assets'
  inputs:
    rootFolderOrFile'heroImages'
    includeRootFolderfalse
    archiveType'zip'
    archiveFile'$(Build.ArtifactStagingDirectory)/$(Build.BuildId).zip'
    replaceExistingArchivetrue
taskPublishBuildArtifacts@1
  displayName'Publish zipped assets for deployment'
  inputs:
    PathtoPublish'$(Build.ArtifactStagingDirectory)/$(Build.BuildId).zip'
    ArtifactName'drop'
    publishLocation'Container'
    

Keep in mind this will not deploy anything, it will simply get it ready for deployment, if you do push this new YAML file, go to the job once it's finished you can click on the artifact created, download it and inspect it to see the contents of your heroImages folder.


That's is for this post, in the next one we'll set up the Continuous Deployment part of our CICD pipeline, that's where we will move our images into our azure Blob storage.

Thursday, 6 October 2022

CICD pipeline for Azure Blob storage with CDN - Part 3 Powershell to provision Azure infrastructure

Now the meat let's set up our AzureInfrastructure.ps1 script, open it in your ms Code editor, and let's start by setting up some input parameters and creating a simple function to create a resource group in azure for us.

Param (
  [Parameter()][String]$location,
  [Parameter()][String]$name,
  [Parameter()][String]$env)

#create resource group
function CreateResourceGroup {
    Param(
        [Parameter(Mandatory=$true)][String]$name,
        [Parameter(Mandatory=$true)][String]$location,
        [Parameter(Mandatory=$true)][String]$env)

    #setup resource Group name using prefix
    $rgName = ("rg-$name-$env").ToLower()

    #check if resource group already exists
    $resourceGroup = Get-AzResourceGroup `
        -Name $rgName `
        -ErrorAction SilentlyContinue
    if($resourceGroup){
        Write-host "Resource group '$rgName' already exists" -foregroundcolor yellow
        return $rgName
    }

    #create resource group
    try {
        Write-Host "Createing '$rgName' resource group in '$location'" -ForegroundColor Magenta
        $resourceGroup = New-AzResourceGroup `
            -Name $rgName `
            -Location $location
        Write-host "Resource group '$rgName' created  in '$location'" -foregroundcolor Green
        return $rgName
    }
    catch {
        #failed to create resourcec group  
         Write-error "Resource group '$rgName' NOT created" -ErrorAction Stop  
    }
}


$rgName = CreateResourceGroup $name $location $env

These will let our YAML file input parameters to our PowerShell which will make our lives easier in the long run, our powershell then will use those parameters to build our infrastructure. 

Now that we have parameterized our PowerShell script, let's jump back to our YAML file and pass those parameters to our script

# Starter pipeline
# Start with a minimal pipeline that you can customize to build and deploy your code.
# Add steps that build, run tests, deploy, and more:
# https://aka.ms/yaml

trigger:
- dev
- test
- master

variables:
  ${{ if startsWith(variables['Build.SourceBranch'], 'refs/heads/') }}:
    branchName: $[ replace(variables['Build.SourceBranch'], 'refs/heads/', '') ]
  ${{ if startsWith(variables['Build.SourceBranch'], 'refs/pull/') }}:
    branchName: $[ replace(variables['System.PullRequest.TargetBranch'], 'refs/heads/', '') ]
  name: 'pav'
  location: 'westeurope'
  azureSubscription: 'Pavs Subscription(6e72246e-0000-0000-0000-000000000000)'

pool:
  vmImage: 'windows-latest'

steps:
- script: |
    echo BranchName = '$(branchName)'
    echo name = '$(name)'
    echo location = '$(location)'
    echo azureSubscription = '$(azureSubscription)'
  displayName: 'List YAML variables'

- task: AzurePowerShell@5
  inputs:
    azureSubscription: '$(azureSubscription)'
    ScriptType: 'FilePath'
    ScriptPath: '$(Build.SourcesDirectory)/AzureInfrastructure.ps1'
    ScriptArguments: >
      -location: $(location)
      -name: $(name)
      -env: $(branchName)
    errorActionPreference: 'continue'
    FailOnStandardError: true
    azurePowerShellVersion: 'LatestVersion'

with those two changes complete and SAVED, let's test our work, in theory all we have to do now, is commit our changes and push our code, Devops should pick them up, connect to azure and create our resource group.

the command we execute in our command line are

  1. Add our changes to our repo: git add .
  2. commit our changes : git commit -m 'a comment for our source control'
  3. push our changes: git push
and that's it, now we can go back to our azure devops portal to see if our pipeline ran correctly.


from the looks of our job, it was a success, now lets do one final check and login to our Azure portal and see if in fact we have a resource group called 'rg-pav-master'


and sure enough there it is our resource group, alright next step is to update our powershell to create a Blob storage in our resource group.

let's create a powershell function that does just that.

#create Blob storage account
function CreateStorageAcccount {
    param (
        [Parameter(Mandatory=$true)][String]$name,
        [Parameter(Mandatory=$true)][String]$rgName,
        [Parameter(Mandatory=$true)][String]$location,
        [Parameter(Mandatory=$true)][String]$env)  
   
    $stName = "st$name$env".ToLower();

    $storageAccount = Get-AzStorageAccount `
        -ResourceGroupName $rgName `
        -Name $stName `
        -ErrorAction SilentlyContinue

    if($storageAccount){
        Write-host "Sorage account '$stName' already exists in resouce group '$rgName'" -foregroundcolor yellow
        return $stName
    }

     #create storage account
     try {
        Write-Host "Createing storage account '$stName' in resource group in '$rgname'" -ForegroundColor Magenta
        $storageAccount =  New-AzStorageAccount `
            -ResourceGroupName $rgName `
            -Name $stName `
            -Location $location `
            -SkuName Standard_LRS `
            -Kind BlobStorage `
            -AccessTier Hot
   
        Write-host "Storage account created" -foregroundcolor Green
        return $stName
    }
    catch {
        #failed to create storagte account  
         Write-error "storage account '$stName' NOT created in resouce group '$rgName'" -ErrorAction Stop  -foregroundcolor red
    }
}

notice the section in the try catch statement, here we create a new storage account, we set it to blob storage and to 'Locally-redundant storage (LRS)' because that's the cheapest option.

Now that we have our Blob storage set up, we have to configure a public container for our files, this is where they will be hosted.

#create Blob storage container
function CreateStorageContainer {
    param (
        [Parameter(Mandatory=$true)][String]$name,
        [Parameter(Mandatory=$true)][String]$rgName,
        [Parameter(Mandatory=$true)][String]$env,
        [Parameter(Mandatory=$true)][String]$stName)

    $strContainerName = "container-public-$name-$env".ToLower()

    $key = Get-AzStorageAccountKey `
        -ResourceGroupName $rgName `
        -Name $stName

    $stContext = New-AzStorageContext `
        -StorageAccountName $stName `
        -StorageAccountKey $key[0].Value
    $strContainer = Get-AzStorageContainer `
        -Name $strContainerName `
        -Context $stContext `
        -ErrorAction SilentlyContinue

    if($strContainer){
        Write-host "storage container '$strContainerName' already exists" -foregroundcolor yellow
        return $strContainer
    }

     # Create new storage container
     try {
        Write-Host "Creating storage container $strContainerName" -ForegroundColor Magenta
        $strContainer = New-AzStorageContainer `
            -Name $strContainerName `
            -Permission Blob `
            -Context $stContext
        Write-host "storage container '$strContainerName' created" -foregroundcolor Green
        return $strContainer
    }
    catch {
        #failed to create resource group  
        Write-error "CDN profile '$cdnProfileName' NOT created in '$rgName'" -ErrorAction Stop  
    }
}

with that set up, now we will start building our CDN, that is what is going to cache our images all over the world, so that if our site is hosted in West Europe, but our users are in Australia they will still receive optimal performance.

Let's create a cdn profile function.

# create a CDN profile
function CreateCdnProfile{
    param (
        [Parameter(Mandatory=$true)][String]$name,
        [Parameter(Mandatory=$true)][String]$rgName,
        [Parameter(Mandatory=$true)][String]$location,
        [Parameter(Mandatory=$true)][String]$env)  

        $cdnProfileName = "cdn-profile-$name-$env"
        $cdnProfile = Get-AzCdnProfile `
            -ProfileName $cdnProfileName `
            -ResourceGroupName $rgName `
            -ErrorAction SilentlyContinue

        if($cdnProfile){
            Write-host "CDN '$cdnProfileName' already exists in resource group '$rgName'" -foregroundcolor yellow
            return $cdnProfileName
        }

        # Create a new cdn profile
        try {
            Write-Host "Createing cdn profile $cdnProfileName in resource group in $rgname" -ForegroundColor Magenta
            $cdnProfile =  New-AzCdnProfile `
                -ProfileName $cdnProfileName `
                -ResourceGroupName $rgName `
                -Sku Standard_Microsoft `
                -Location $location
            Write-host "Cdn profile '$cdnProfileName' created in '$rgName'" -foregroundcolor Green
            return $cdnProfileName
        }
        catch {
            #failed to create resourcec group  
            Write-error "CDN profile '$cdnProfileName' NOT created in '$rgName'" -ErrorAction Stop  
        }
}

With that complete, we now create a cdn endpoint.

#create a cdn endpoint
function CreateCdnEndPoint{
    param (
        [Parameter(Mandatory=$true)][String]$cdnProfileName,
        [Parameter(Mandatory=$true)][String]$name,
        [Parameter(Mandatory=$true)][String]$rgName,
        [Parameter(Mandatory=$true)][String]$location,
        [Parameter(Mandatory=$true)][String]$stName,
        [Parameter(Mandatory=$true)][String]$env)  

    $cdnEndPointName = "cdn-endpoint-$name-$env-$location"
    Write-Host "-ResourceGroupName $rgName -ProfileName $cdnProfileName -Name $cdnEndPointName "
   
   $cdnEndpoint = Get-AzCdnEndpoint `
        -ResourceGroupName $rgName `
        -ProfileName $cdnProfileName `
        | Where-Object {$_.Name -eq $cdnEndPointName}

   if($cdnEndpoint){
       Write-host "cdn endpoint '$cdnEndpointName' already exists in resource group $rgName" -foregroundcolor yellow
       return $cdnEndpoint
   }

    # Create new cdn endpoint
    try {
        Write-Host "Createing CDN endPoint $cdnEndPointName in resource group $rgName" -ForegroundColor Magenta
        $originHostHeader = "$stName.blob.core.windows.net"
       
        $origin = @{
            Name = $originHostHeader.Replace('.','-')
            HostName = $originHostHeader
        };
        New-AzCdnEndpoint `
            -ResourceGroupName $rgName `
            -ProfileName $cdnProfileName `
            -OriginHostHeader  $originHostHeader `
            -Name $cdnEndPointName `
            -Location $location `
            -OptimizationType "GeneralWebDelivery" `
            -Origin $origin
           
        Write-host "cdn endpoint '$cdnEndPointName' created in '$rgName'" -foregroundcolor Green
        return $cdnEndpoint
    }
    catch {
        #failed to create cdn endpoint
        Write-error "CDN endpoint '$cdnEndPointName' NOT created in '$rgName'" -ErrorAction Stop  
    }  
}

With all of our function written let's call them at the end of our script.

$rgName = CreateResourceGroup $name $location $env
$stName = CreateStorageAcccount $name $rgName $location $env
$stContainer = CreateStorageContainer $name $rgName $env $stName
$cdnProfileName = CreateCdnProfile $name $rgName $location $env
CreateCdnEndPoint $name $rgName $location $stName $cdnProfileName $env

and for good measure, here's our script in it's entirety 

Param (
    [Parameter()][String]$location,
    [Parameter()][String]$name,
    [Parameter()][String]$env)

    $name= 'pav'
    $location= 'westeurope'
    $env = "master"
    $tenantId= '00000000-0000-00000-00000-0000000000000'
    $subscriptionId= '000000000-00000-0000-0000-000000000000'
#create resource group
function CreateResourceGroup {
    Param(
        [Parameter(Mandatory=$true)][String]$name,
        [Parameter(Mandatory=$true)][String]$location,
        [Parameter(Mandatory=$true)][String]$env)

    #setup resource Group name using prefix
    $rgName = ("rg-$name-$env").ToLower()

    #check if resource group already exists
    $resourceGroup = Get-AzResourceGroup `
        -Name $rgName `
        -ErrorAction SilentlyContinue

    if($resourceGroup){
        Write-host "Resource group '$rgName' already exists" -foregroundcolor yellow
        return $rgName
    }

    #create resource group
    try {
        Write-Host "Createing '$rgName' resource group in '$location'" -ForegroundColor Magenta
        $resourceGroup = New-AzResourceGroup `
            -Name $rgName `
            -Location $location
        Write-host "Resource group '$rgName' created  in '$location'" -foregroundcolor Green
        return $rgName
    }
    catch {
        #failed to create resourcec group  
         Write-error "Resource group '$rgName' NOT created" -ErrorAction Stop  
    }
}

#create Blob storage account
function CreateStorageAcccount {
    param (
        [Parameter(Mandatory=$true)][String]$name,
        [Parameter(Mandatory=$true)][String]$rgName,
        [Parameter(Mandatory=$true)][String]$location,
        [Parameter(Mandatory=$true)][String]$env)  
   
    $stName = "st$name$env";
   
    Write-Host "Create storage account with $stName $rgName $env"

    $storageAccount = Get-AzStorageAccount -ResourceGroupName $rgName -Name $stName -ErrorAction SilentlyContinue

    if($storageAccount){
        Write-host "Sorage account '$stName' already exists in resouce group '$rgName'" -foregroundcolor yellow
        return $stName
    }

     #create storage account
     try {
        Write-Host "Createing storage account '$stName' in resource group in '$rgname'" -ForegroundColor Magenta
        $storageAccount =  New-AzStorageAccount `
            -ResourceGroupName $rgName `
            -Name $stName `
            -Location $location `
            -SkuName Standard_LRS `
            -Kind BlobStorage `
            -AccessTier Hot
   
        Write-host "Storage account created" -foregroundcolor Green
        return $stName
    }
    catch {
        #failed to create storagte account  
         Write-error "storage account '$stName' NOT created in resouce group '$rgName'" -ErrorAction Stop  -foregroundcolor red
    }
}

#create Blob storage container
function CreateStorageContainer {
    param (
        [Parameter(Mandatory=$true)][String]$name,
        [Parameter(Mandatory=$true)][String]$rgName,
        [Parameter(Mandatory=$true)][String]$env,
        [Parameter(Mandatory=$true)][String]$stName)

    $strContainerName = "container-public-$name-$env".ToLower()
    Write-Host "$strContainerName $rgName $env $stName"
    $key = Get-AzStorageAccountKey `
        -ResourceGroupName $rgName `
        -Name $stName

    $stContext = New-AzStorageContext `
        -StorageAccountName $stName `
        -StorageAccountKey $key[0].Value

    $strContainer = Get-AzStorageContainer `
        -Name $strContainerName `
        -Context $stContext `
        -ErrorAction SilentlyContinue

    if($strContainer){
        Write-host "storage container '$strContainerName' already exists" -foregroundcolor yellow
        return $strContainer
    }

     # Create new storage coantainer
     try {
        Write-Host "Createing storage container $strContainerName" -ForegroundColor Magenta
        $strContainer = New-AzStorageContainer `
            -Name $strContainerName `
            -Permission Blob `
            -Context $stContext
        Write-host "storage container '$strContainerName' created" -foregroundcolor Green
        return $strContainer
    }
    catch {
        #failed to create resourcec group  
        Write-error "CDN profile '$cdnProfileName' NOT created in '$rgName'" -ErrorAction Stop  
    }
}

# create a CDN profile
function CreateCdnProfile{
    param (
        [Parameter(Mandatory=$true)][String]$name,
        [Parameter(Mandatory=$true)][String]$rgName,
        [Parameter(Mandatory=$true)][String]$location,
        [Parameter(Mandatory=$true)][String]$env)  

        $cdnProfileName = "cdn-profile-$name-$env"
        $cdnProfile = Get-AzCdnProfile `
            -ProfileName $cdnProfileName `
            -ResourceGroupName $rgName `
            -ErrorAction SilentlyContinue

        if($cdnProfile){
            Write-host "CDN '$cdnProfileName' already exists in resource group '$rgName'" -foregroundcolor yellow
            return $cdnProfileName
        }

        # Create a new cdn profile
        try {
            Write-Host "Createing cdn profile $cdnProfileName in resource group in $rgname" -ForegroundColor Magenta
            $cdnProfile =  New-AzCdnProfile `
                -ProfileName $cdnProfileName `
                -ResourceGroupName $rgName `
                -Sku Standard_Microsoft `
                -Location $location
            Write-host "Cdn profile '$cdnProfileName' created in '$rgName'" -foregroundcolor Green
            return $cdnProfileName
        }
        catch {
            #failed to create resourcec group  
            Write-error "CDN profile '$cdnProfileName' NOT created in '$rgName'" -ErrorAction Stop  
        }
}

#create a cdn endpoint
function CreateCdnEndPoint{
    param (
        [Parameter(Mandatory=$true)][String]$cdnProfileName,
        [Parameter(Mandatory=$true)][String]$name,
        [Parameter(Mandatory=$true)][String]$rgName,
        [Parameter(Mandatory=$true)][String]$location,
        [Parameter(Mandatory=$true)][String]$stName,
        [Parameter(Mandatory=$true)][String]$env)  

    $cdnEndPointName = "cdn-endpoint-$name-$env-$location"
    Write-Host "-ResourceGroupName $rgName -ProfileName $cdnProfileName -Name $cdnEndPointName "
   
   $cdnEndpoint = Get-AzCdnEndpoint `
        -ResourceGroupName $rgName `
        -ProfileName $cdnProfileName `
        | Where-Object {$_.Name -eq $cdnEndPointName}

   if($cdnEndpoint){
       Write-host "cdn endpoint '$cdnEndpointName' already exists in resource group $rgName" -foregroundcolor yellow
       return $cdnEndpoint
   }

    # Create new cdn endpoint
    try {
        Write-Host "Createing CDN endPoint $cdnEndPointName in resource group $rgName" -ForegroundColor Magenta
        $originHostHeader = "$stName.blob.core.windows.net"
       
        $origin = @{
            Name = $originHostHeader.Replace('.','-')
            HostName = $originHostHeader
        };
        New-AzCdnEndpoint `
            -ResourceGroupName $rgName `
            -ProfileName $cdnProfileName `
            -OriginHostHeader  $originHostHeader `
            -Name $cdnEndPointName `
            -Location $location `
            -OptimizationType "GeneralWebDelivery" `
            -Origin $origin
           
        Write-host "cdn endpoint '$cdnEndPointName' created in '$rgName'" -foregroundcolor Green
        return $cdnEndpoint
    }
    catch {
        #failed to create cdn endpoint
        Write-error "CDN endpoint '$cdnEndPointName' NOT created in '$rgName'" -ErrorAction Stop  
    }  
}

Register-AzResourceProvider -ProviderNamespace "Microsoft.Cdn"

$rgName = CreateResourceGroup $name $location $env
$stName = CreateStorageAcccount $name $rgName $location $env
$stContainer = CreateStorageContainer $name $rgName $env $stName
$cdnProfileName = CreateCdnProfile $name $rgName $location $env
$cdnEndPoint = CreateCdnEndPoint $cdnProfileName $name $rgName $location $stName $env


we are done, provisioning our azure infrastructure, now if you do a git add . , git commit -m 'comment', and a git push, our Continuous Integration pipeline, should execute our script and build our Azure infrastructure.

there is one problem, the script will fail to create an endpoint, you'll have to do it manually.