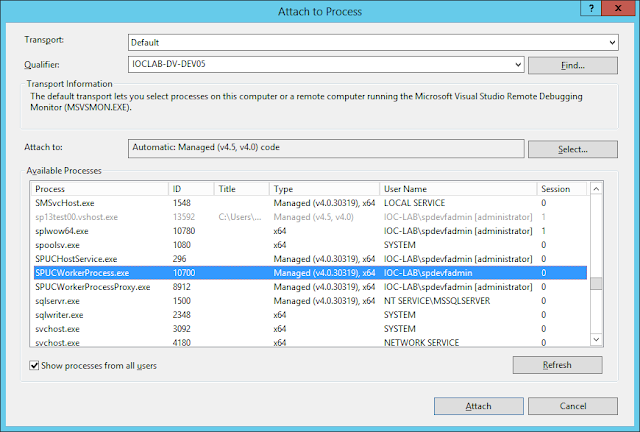
Sandbox Solutions do not run on the w3wp.exe process they actual run on SPUCWorkerProcess.exe, so that's what you have to attach to in visual studio.
Wednesday 26 February 2014
Saturday 22 February 2014
List property bag content
function LoadSharePointPowerShellEnviroment
{
write-host
write-host "Setting up Powershell enviroment for Sharepoint" -foregroundcolor Magenta
Add-PSSnapin "Microsoft.Sharepoint.PowerShell" -ErrorAction SilentlyContinue
Write-host "Sharepoint PowerShell Snapin loaded." -foregroundcolor Green
}
Clear-Host
LoadSharePointPowerShellEnviroment
write-host
$url= 'https://collaboration-dev5.ioc-lab.local/sites/ApprovalsPortal'
$site = New-Object Microsoft.SharePoint.SPSite($url)
$rootWeb = $site.RootWeb
Write-Host -foregroundcolor Green "The current Site"$rootWeb
$properties = $rootWeb.AllProperties
$properties.Keys | % {write-host $_":" $properties[$_]}
if ($rootWeb -ne $null)
{
$rootWeb.Dispose()
}
If ($site -ne $null)
{
$site.Dispose();
}
Write-Host -foregroundcolor Green "Script has finished executing "
{
write-host
write-host "Setting up Powershell enviroment for Sharepoint" -foregroundcolor Magenta
Add-PSSnapin "Microsoft.Sharepoint.PowerShell" -ErrorAction SilentlyContinue
Write-host "Sharepoint PowerShell Snapin loaded." -foregroundcolor Green
}
Clear-Host
LoadSharePointPowerShellEnviroment
write-host
$url= 'https://collaboration-dev5.ioc-lab.local/sites/ApprovalsPortal'
$site = New-Object Microsoft.SharePoint.SPSite($url)
$rootWeb = $site.RootWeb
Write-Host -foregroundcolor Green "The current Site"$rootWeb
$properties = $rootWeb.AllProperties
$properties.Keys | % {write-host $_":" $properties[$_]}
if ($rootWeb -ne $null)
{
$rootWeb.Dispose()
}
If ($site -ne $null)
{
$site.Dispose();
}
Write-Host -foregroundcolor Green "Script has finished executing "
Labels:
Powershell
Thursday 13 February 2014
Sandbox add To Property Bag
You can't add to the property bag in a sandbox solution as you would in a farm solution; In a farm solution you would access the AllProperties or Properties collections, but in a sandbox solution you have to use the functions exposed on the SPWeb class.
// Uncomment the method below to handle the event raised after a feature has been activated.
public override void FeatureActivated(SPFeatureReceiverProperties properties)
{
var web = properties.Feature.Parent as SPWeb;
AddValueToPropertyBag(web, "language_en_location", "/sites/ApprovalsPortal/SiteAssets/Navigation_en.xml");
}
private void AddValueToPropertyBag(SPWeb web, string key, string value)
{
if (web != null)
{
web.SetProperty(key, value);
web.AllowUnsafeUpdates = true;
web.Update();
web.AllowUnsafeUpdates = false;
}
}
// Uncomment the method below to handle the event raised before a feature is deactivated.
public override void FeatureDeactivating(SPFeatureReceiverProperties properties)
{
var web = properties.Feature.Parent as SPWeb;
RemoveValueFromPropertyBag(web, "language_en_location");
}
private void RemoveValueFromPropertyBag(SPWeb web, object key)
{
if (web != null && web.AllProperties.ContainsKey(key))
{
web.AllowUnsafeUpdates = true;
web.DeleteProperty(key);
web.Update();
web.AllowUnsafeUpdates = false;
}
}
Labels:
SharePoint 2010
Saturday 8 February 2014
Replicator
This is a continuation of my previous post Multiple Tasks. The video by Scot Hillier is probably more then enough to complete this part, so I'm just going to skim over it.
Open up the workflow you created in the previous post, add a replicator and inside of it add your taskGenerator, if you do not see your task generator in your tool box, make sure to deploy your project.
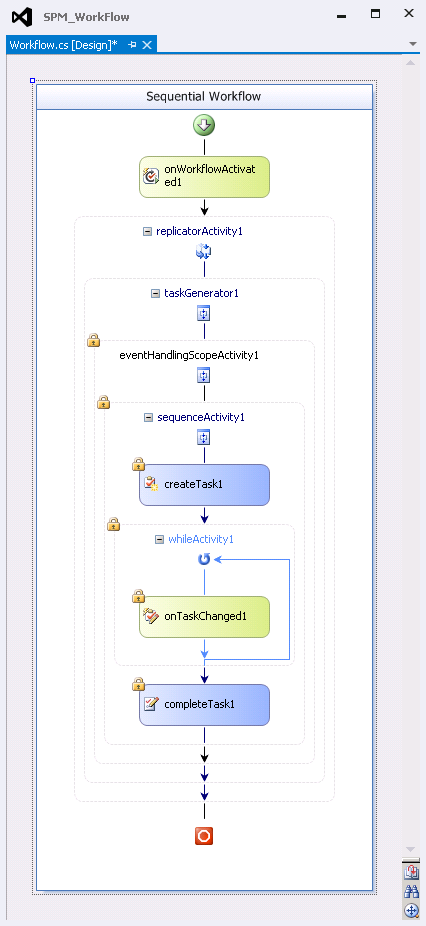
now that you've added your task generator your workflow should look like
right click on your replicator and select generate handlers. this is what you should see
we are really only going to focus on two of the functions:
so you can delete the other two if you'd like, one other thing that you're going to have to do is create an iList, this what you should end up with
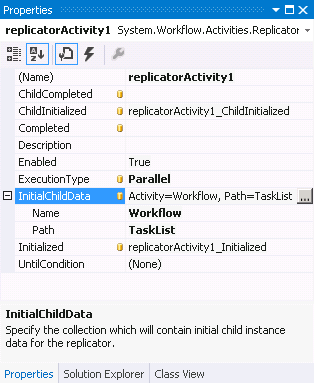
Notice the highlighted IList, lets go back to our replicatorActivity properties
also if you removed the two completed fucntions your'e going to have to remove them from the properties to end up with.
Now go back into the code and lets focus on the replicatorActivity1_Initialized function.
next lets look at the replicatorActivity1_ChildInitialized function
now deploy your project and test out your workflow
Open up the workflow you created in the previous post, add a replicator and inside of it add your taskGenerator, if you do not see your task generator in your tool box, make sure to deploy your project.
now that you've added your task generator your workflow should look like
right click on your replicator and select generate handlers. this is what you should see
using System;
using System.ComponentModel;
using System.ComponentModel.Design;
using System.Collections;
using System.Drawing;
using System.Linq;
using System.Workflow.ComponentModel.Compiler;
using System.Workflow.ComponentModel.Serialization;
using System.Workflow.ComponentModel;
using System.Workflow.ComponentModel.Design;
using System.Workflow.Runtime;
using System.Workflow.Activities;
using System.Workflow.Activities.Rules;
using Microsoft.SharePoint;
using Microsoft.SharePoint.Workflow;
using Microsoft.SharePoint.WorkflowActions;
namespace SPM_WorkFlow.Workflow
{
public sealed partial class Workflow : SequentialWorkflowActivity
{
public Workflow()
{
InitializeComponent();
}
public Guid workflowId = default(System.Guid);
public SPWorkflowActivationProperties workflowProperties = new SPWorkflowActivationProperties();
private void replicatorActivity1_ChildInitialized(object sender, ReplicatorChildEventArgs
e)
{
}
private void replicatorActivity1_ChildCompleted(object sender, ReplicatorChildEventArgs
e)
{
}
private void replicatorActivity1_Completed(object sender, EventArgs e)
{
}
private void replicatorActivity1_Initialized(object sender, EventArgs e)
{
}
}
}
- replicatorActivity1_Initialized
- replicatorActivity1_ChildInitialized
so you can delete the other two if you'd like, one other thing that you're going to have to do is create an iList, this what you should end up with
using System;
using System.ComponentModel;
using System.ComponentModel.Design;
using System.Collections;
using System.Drawing;
using System.Linq;
using System.Workflow.ComponentModel.Compiler;
using System.Workflow.ComponentModel.Serialization;
using System.Workflow.ComponentModel;
using System.Workflow.ComponentModel.Design;
using System.Workflow.Runtime;
using System.Workflow.Activities;
using System.Workflow.Activities.Rules;
using Microsoft.SharePoint;
using Microsoft.SharePoint.Workflow;
using Microsoft.SharePoint.WorkflowActions;
namespace SPM_WorkFlow.Workflow
{
public sealed partial class Workflow : SequentialWorkflowActivity
{
public Workflow()
{
InitializeComponent();
}
public IList TaskList = default(System.Collections.IList);
public Guid workflowId = default(System.Guid);
public SPWorkflowActivationProperties workflowProperties = new SPWorkflowActivationProperties();
private void replicatorActivity1_ChildInitialized(object sender, ReplicatorChildEventArgs
e)
{
}
private void replicatorActivity1_Initialized(object sender, EventArgs e)
{
}
}
}
- bind the InitialChildData to our IList TaskList.
- set the execution type to Parallel
also if you removed the two completed fucntions your'e going to have to remove them from the properties to end up with.
private void replicatorActivity1_Initialized(object sender, EventArgs e)
{
//set up
the array list, which is going to be distributed amoungst each instance
//the
task gernator activity
TaskList = new ArrayList();
TaskList.Add(@"Domain\User1");
TaskList.Add(@"Domain\User2");
TaskList.Add(@"Domain\User3");
TaskList.Add(@"Domain\User4");
//initiate
the first task
taskGenerator1.Task_Title = "My Task";
taskGenerator1.Task_Description = "<ul><li>One</li><li>Two</li></ul>";
taskGenerator1.Task_AssignedTo =
TaskList[0].ToString();
taskGenerator1.Site_GUID =
workflowProperties.SiteId;
}
private void replicatorActivity1_ChildInitialized(object sender, ReplicatorChildEventArgs
e)
{
taskGenerator1.Task_Title = "My Task";
taskGenerator1.Task_Description = "<ul><li>One</li><li>Two</li></ul>";
taskGenerator1.Task_AssignedTo =
e.InstanceData.ToString();
taskGenerator1.Site_GUID =
workflowProperties.SiteId;
}
Labels:
SharePoint 2010,
Workflow
Multiple Task
I'm developing a workflow that requires an unknown number of system administrators to complete one to many tasks, each. This is a computer access form, basically when we get a new hire a manager fills out a request for computer access form; the manager checks off a bunch of boxes on a piece of paper and sends it to IT via inner office mail. Antiquated? Absolutely, but that's why I'm bringing it into our SharePoint environment. The end goal is to have a web on our IT Site that has a list of pages each of which contains a form that will fire off a workflow.
What I need is an ability to create multiple Tasks without knowing how many, hence we can't use the parallel structure, what we need is some sort of workflow foreach: luckily there's a MSDN article on just such a procedure.
http://msdn.microsoft.com/en-us/library/hh128696(v=office.14).aspx by Scot Hillier
Now this is exactly what I used, It's very good, but makes a lot of assumptions about previous knowledge, I had to dedicate a couple of days to fully understand it and what I was doing wrong. I suggest that you take the 8 minutes to watch it, and if that's all you need great, if like me that's just not enough keep reading hopefully I'll shed some light on any difficulties that you're having.
To get started create, a SharePoint 2010 project
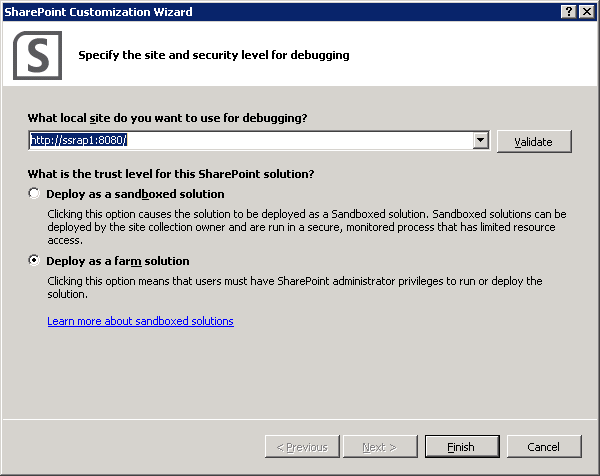
Scope it to the farm level.
First thing we are going to do is add a sequential workflow to our project; select your project in the solution explorer and hit Ctrl+Shift+a tobring up the "Add New Item" window; in the left hand pane under the "Visual C# Items" -> "SharePoint"->2010 select "Sequential Workflow (Farm Solution only), give it a name and hit add.
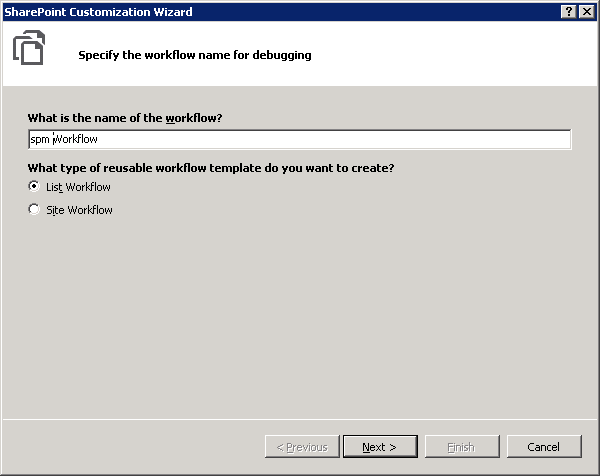
Next give it a name and select List Workflow
Finally do not associate your Workflow with any lists and hit finish.
And you have your workflow.
with that done, let's start on our custom sequence activity. Select the project in the solution explorer and hit Ctrl+Shift+a to bring up the "Add New Item" window; in the left hand pane under the "Visual C# Items" section select General and pick the Component Class, name it TaskGenerator.
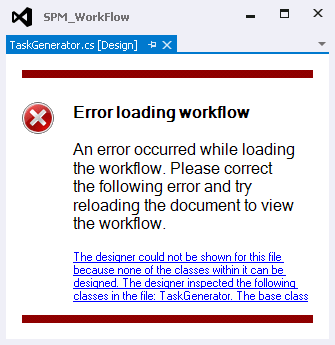
You should see the following error when looking at the task generator design
Don't panic, this is normal, in the solution explorer expand TaskGenerator.cs.
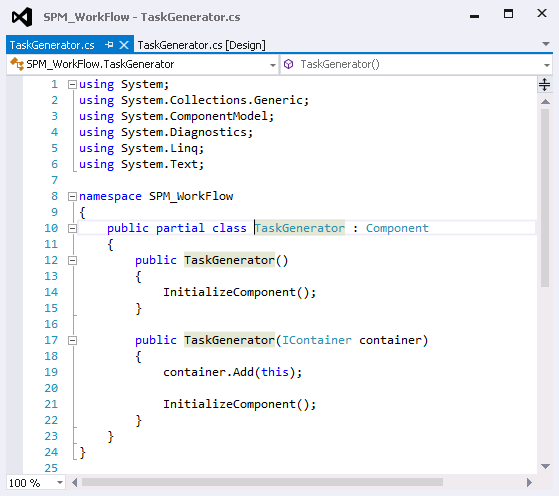
with that open you should see
we're going to make some slight modifications
you should end up with
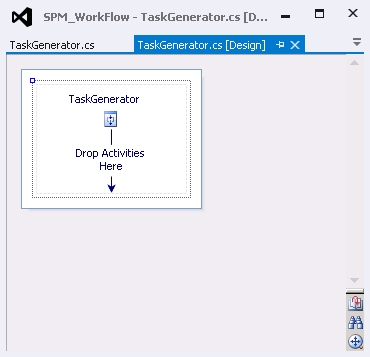
now open up the Task Generator Design again
and all should be well. Next we are going to build our main logic
this is what it should look like
next we are going to have to deal with all those exclamation marks
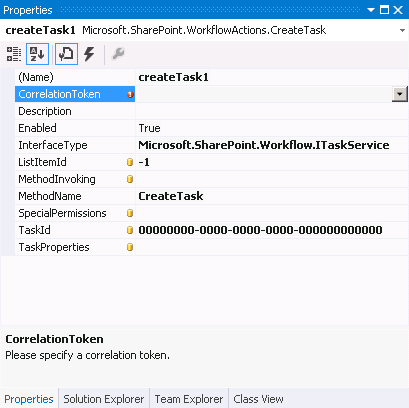
First Select the CreateTask1 object, and hit F4 to bring up the properties menu, below is what you should see.
Obviously we need to deal with the CorelationToken, so lets do that first.
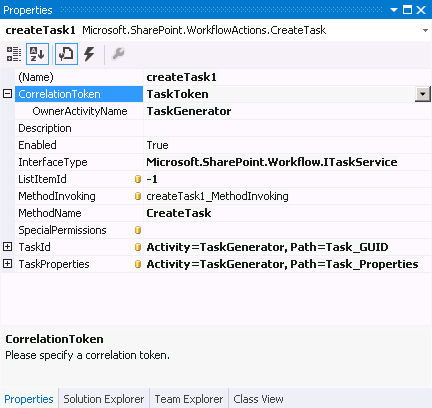
Type in TaskToken and hit enter
next expand the CorrelationToken
under the OwnerActivityName, select TaskGenerator (assuming you didn't leave it as component1)
With that out of the way, we still have to bind TaskId, and TaskProperties; I'll walk you through TaskId, and then just follow more or less the same steps for TaskProperties:
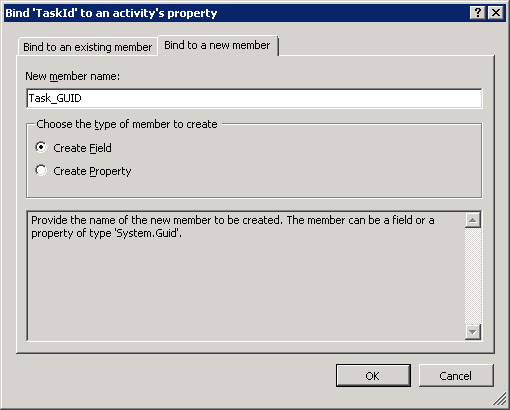
click inside the TaskId value field the zero'd GUID, this will bring up three little dots all the way to the right of the field.
this will create a public Guid in your code behind, now do the same for task properties, I called the field Task_Properties. Next right click on the Create task workflow activity and hit Generate Handlers.
This will bring you into your code and should look something like this.
Now what we're going to do:
your'e code should look like
If you go back to your designer below is what your properties should look like once you're done with the CreateTask workflow action.
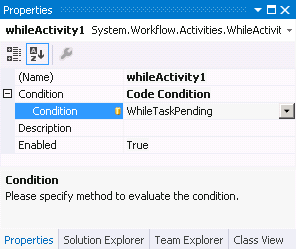
next lets tackle our while activity; select your while activity in the designer and again hit F4 for the properties.
For the condition select Code Condition
expand that
and fill in WhileTaskPending and hit enter
that again will bring you to the code and show you your new function, but this time lets make some changes.
notice the highlighted lines, the way this while loop works is if the condition is true it'll loop again, so next we are going to check if the task is complete using the on task changed activity. Go back to your designer and select the onTaskChanged and bring up it's properties.
Again lets make our code change.
What I need is an ability to create multiple Tasks without knowing how many, hence we can't use the parallel structure, what we need is some sort of workflow foreach: luckily there's a MSDN article on just such a procedure.
http://msdn.microsoft.com/en-us/library/hh128696(v=office.14).aspx by Scot Hillier
Now this is exactly what I used, It's very good, but makes a lot of assumptions about previous knowledge, I had to dedicate a couple of days to fully understand it and what I was doing wrong. I suggest that you take the 8 minutes to watch it, and if that's all you need great, if like me that's just not enough keep reading hopefully I'll shed some light on any difficulties that you're having.
To get started create, a SharePoint 2010 project
Scope it to the farm level.
First thing we are going to do is add a sequential workflow to our project; select your project in the solution explorer and hit Ctrl+Shift+a tobring up the "Add New Item" window; in the left hand pane under the "Visual C# Items" -> "SharePoint"->2010 select "Sequential Workflow (Farm Solution only), give it a name and hit add.
Next give it a name and select List Workflow
Finally do not associate your Workflow with any lists and hit finish.
And you have your workflow.
with that done, let's start on our custom sequence activity. Select the project in the solution explorer and hit Ctrl+Shift+a to bring up the "Add New Item" window; in the left hand pane under the "Visual C# Items" section select General and pick the Component Class, name it TaskGenerator.
You should see the following error when looking at the task generator design
Don't panic, this is normal, in the solution explorer expand TaskGenerator.cs.
with that open you should see
we're going to make some slight modifications
- remove the constructor public TaskGenerator(IContainer container)
- add using System.Workflow.Activities;
- change the inheritance from Component to SequenceActivity
you should end up with
using System;
using System.Collections.Generic;
using System.ComponentModel;
using System.Diagnostics;
using System.Linq;
using System.Text;
using System.Workflow.Activities;
namespace SPM_WorkFlow
{
public partial class TaskGenerator : SequenceActivity
{
public TaskGenerator()
{
InitializeComponent();
}
}
}
and all should be well. Next we are going to build our main logic
- add an eventHandlingScopeActivity
- inside the eventHandlingScopeActivity add a sequenceActivity
- Inside the sequenceActivity add a createTask
- Under the create task add a whileActivity
- inside the whileActivity add an onTaskChanged
- directly after the while add a CompleteTask
this is what it should look like
next we are going to have to deal with all those exclamation marks
First Select the CreateTask1 object, and hit F4 to bring up the properties menu, below is what you should see.
Obviously we need to deal with the CorelationToken, so lets do that first.
Type in TaskToken and hit enter
next expand the CorrelationToken
under the OwnerActivityName, select TaskGenerator (assuming you didn't leave it as component1)
With that out of the way, we still have to bind TaskId, and TaskProperties; I'll walk you through TaskId, and then just follow more or less the same steps for TaskProperties:
click inside the TaskId value field the zero'd GUID, this will bring up three little dots all the way to the right of the field.
- click those dots. this will bring up the bind window, click the second tab "Bind to a new member"
- give the member a better name and select "Create Field"
- Click OK.
this will create a public Guid in your code behind, now do the same for task properties, I called the field Task_Properties. Next right click on the Create task workflow activity and hit Generate Handlers.
This will bring you into your code and should look something like this.
Now what we're going to do:
- assign a unique value to the Task_GUID
- create four public properties:
- Task_Title
- Task_Description
- Task_AssignedTo
- Site_GUID
your'e code should look like
using System;
using System.Collections.Generic;
using System.ComponentModel;
using System.Workflow.Activities;
namespace SPM_WorkFlow
{
public partial class TaskGenerator : SequenceActivity
{
public TaskGenerator()
{
InitializeComponent();
}
public Guid Task_GUID = default(System.Guid);
public Microsoft.SharePoint.Workflow.SPWorkflowTaskProperties
Task_Properties = new Microsoft.SharePoint.Workflow.SPWorkflowTaskProperties();
public string Task_Title { get; set; }
public string Task_Description { get; set; }
public string Task_AssignedTo { get; set; }
public Guid Site_GUID { get; set; }
private void createTask1_MethodInvoking(object sender, EventArgs e)
{
Task_GUID = Guid.NewGuid();
Task_Properties.Title = Task_Title;
Task_Properties.AssignedTo =
Task_AssignedTo;
Task_Properties.Description =
Task_Description;
}
}
}
next lets tackle our while activity; select your while activity in the designer and again hit F4 for the properties.
For the condition select Code Condition
expand that
and fill in WhileTaskPending and hit enter
that again will bring you to the code and show you your new function, but this time lets make some changes.
using System;
using System.Collections.Generic;
using System.ComponentModel;
using System.Workflow.Activities;
namespace SPM_WorkFlow
{
public partial class TaskGenerator : SequenceActivity
{
public TaskGenerator()
{
InitializeComponent();
}
public Guid Task_GUID = default(System.Guid);
public Microsoft.SharePoint.Workflow.SPWorkflowTaskProperties
Task_Properties = new Microsoft.SharePoint.Workflow.SPWorkflowTaskProperties();
public string Task_Title { get; set; }
public string Task_Description { get; set; }
public string Task_AssignedTo { get; set; }
public Guid Site_GUID { get; set; }
private bool TaskComplete = false;
private void createTask1_MethodInvoking(object sender, EventArgs e)
{
Task_GUID = Guid.NewGuid();
Task_Properties.Title = Task_Title;
Task_Properties.AssignedTo = Task_AssignedTo;
Task_Properties.Description = Task_Description;
}
private void WhileTaskPending(object sender, ConditionalEventArgs e)
{
e.Result = !TaskComplete;
}
}
}
- bind AfterProperties and BeforeProperties to new Fields Task_AfterProperties and Task_BeforeProperties.
- Select the previously created TaskToken for the CorrelationToken
- bind the TaskId to the prevously created Task_GUID field
- and again right click on it and click generate handlers
Again lets make our code change.
using System;
using System.Collections.Generic;
using System.ComponentModel;
using System.Workflow.Activities;
namespace SPM_WorkFlow
{
public partial class TaskGenerator : SequenceActivity
{
public TaskGenerator()
{
InitializeComponent();
}
public Guid Task_GUID = default(System.Guid);
public Microsoft.SharePoint.Workflow.SPWorkflowTaskProperties
Task_Properties = new Microsoft.SharePoint.Workflow.SPWorkflowTaskProperties();
public string Task_Title { get; set; }
public string Task_Description { get; set; }
public string Task_AssignedTo { get; set; }
public Guid Site_GUID { get; set; }
private bool TaskComplete = false;
private Guid TaskStatusFieldId = new Guid("c15b34c3-ce7d-490a-b133-3f4de8801b76");
private void createTask1_MethodInvoking(object sender, EventArgs e)
{
Task_GUID = Guid.NewGuid();
Task_Properties.Title = Task_Title;
Task_Properties.AssignedTo = Task_AssignedTo;
Task_Properties.Description = Task_Description;
}
private void WhileTaskPending(object sender, ConditionalEventArgs e)
{
e.Result = !TaskComplete;
}
public Microsoft.SharePoint.Workflow.SPWorkflowTaskProperties
Task_AfterProperties = new Microsoft.SharePoint.Workflow.SPWorkflowTaskProperties();
public Microsoft.SharePoint.Workflow.SPWorkflowTaskProperties
Task_BeforeProperties = new Microsoft.SharePoint.Workflow.SPWorkflowTaskProperties();
private void onTaskChanged1_Invoked(object sender, ExternalDataEventArgs e)
{
string taskStatus =
Task_AfterProperties.ExtendedProperties[TaskStatusFieldId].ToString();
TaskComplete = taskStatus.Equals("Completed");
}
}
}
Basically what we did was we added a TaskStatusFieldId and made it equal to the GUID of the status site column on a task, then in our onTaskChanged1_Invoked event we check if the value in that field is equal to complete, if it is then we set our TaskComplete variable to true and the while loop exits allowing the work flow to complete its path.
Back to our designer, we should now only have on last Red Exclamation mark left and it's on our CompleteTask1 activity, to fix it check out the properties:
- again set the CorrelationToken to TaskToken
- Bind the TaskId to our Task_GUID variable
- and set the TaskOutcome to something "Custom Task Complete"
your properties should look like.
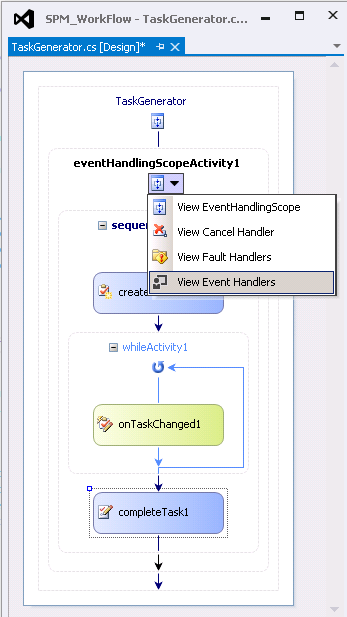
And that should take car of all of your Exclamation marks. Next lets handle if the task is deleted for some reason, on the "eventHandlingScopeActivity1" click the down arrow and select view event handlers
when you click this you should see
- drop an event driven hanlder,
- in that handler add a on task deleted event
- under that put a logToHistoryActivity
you should come out with something along the lines of.
Let's start with the logToHistory_ListActivity1 first, hit F4 on it to see the properties. Bind the following three properties to new fields:
- History Description as Log_HistoryDescription
- History Outcome as Log_HistoryOutcome
- UserId as Log_UserId
This is what your properties should look like once your done.
now select the onTaskDeleted event and hit F4 to see the properties.
- again set the CorrelationToken to TaskToken
- bind The after properties to Task_AfterProperties
- bind the Executor to a new field TaskDeleted_Executor
- bind the TaskID to Task_GUID
- and last hit generateHandlers
now your going to give your log properties values, the outcome and the description are easy.
it's the log that gets tricky, you see workflow run under a different context, meaning that you need to make reference directly to your SharePoint site to get the user id using nothing but the executer. So add the following function to your workflow.
private int GetUserID(string LoginName)
{
int userID = -1;
try
{
using (SPSite site = new SPSite(Site_GUID))
using (SPWeb web = site.RootWeb)
if (web.SiteUsers.GetCollection(new string[] { LoginName
}).Count == 1)
userID = web.SiteUsers[LoginName].ID;
}
finally { }
return userID;
}
this will take in the executors login name and get their UserID from the site that the task was created. Now lets revisit our onTaskDeleted1_Invoked function.
public String Log_HistoryDescription = default(System.String);
public String Log_HistoryOutcome = default(System.String);
public Int32 Log_UserId = default(System.Int32);
public String TaskDeleted_Executor = default(System.String);
private void onTaskDeleted1_Invoked(object sender, ExternalDataEventArgs e)
{
Log_HistoryDescription = Task_Title + " has been deleted";
Log_HistoryOutcome = "The workflow can no longer be complete";
Log_UserId =
GetUserID(TaskDeleted_Executor);
}
private int GetUserID(string LoginName)
{
int userID = -1;
try
{
using (SPSite site = new SPSite(Site_GUID))
using (SPWeb web = site.RootWeb)
if (web.SiteUsers.GetCollection(new string[] { LoginName
}).Count == 1)
userID =
web.SiteUsers[LoginName].ID;
}
finally { }
return userID;
}
and that's it for the Task Generator component, in the next post I'll talk about how to implement it using a replicator in a sequential workflow.
Labels:
SharePoint 2010,
Workflow
Subscribe to:
Posts (Atom)
