Access
Modifier
|
Details
|
public
|
The
member is available to code running in any assembly
|
protected
|
The
member is available only within the containing class or in classes derived
from the containing class
|
internal
|
The
member is available only to code within the current assembly
|
Protected
internal
|
The
member is available to any code within the current assembly, and to types
derived from the containing class in any assembly
|
private
|
The
member is available only within the containing class
|
Wednesday, 30 January 2019
Member accessibility
Wednesday, 23 January 2019
Modal Pages
Every page has an independent Modal Stack, that means that each page we navigate to has it's own stack of modal pages that can have modals pushed and popped to and from them, however by default a modal blocks all functionality underneath it and thus only one model can be "Active" at one time.
Let's create a modal page
our modal page has a back button and a modal button
the back button pops the current modal off our modal stack, whereas the modal button simply pushes another instance of our modal page onto the modal stack, this lets us populate our modal stack with multiple modals and we have to pop each one of them off to get back to our modals containing page.
if you take a look at the modal page you'll notice that that normal header back button is not present

however most devices have a dedicated back button which will pop the modal off the modal stack just the way it should, to block this behavior you can override the OnBackButtonPressed function.
now if you try to push to the normal stack while on a Modal stack you'll get an exception

which is probably a good thing since navigating to a normal page from a modal would be ridiculous.
Let's create a modal page
<?xml version="1.0" encoding="utf-8" ?>
<ContentPage xmlns="http://xamarin.com/schemas/2014/forms"
xmlns:x="http://schemas.microsoft.com/winfx/2009/xaml"
x:Class="pav.StackNavigation.Views.ModalPage">
<ContentPage.Content>
<StackLayout>
<Label Text="This is a modal page"
VerticalOptions="CenterAndExpand"
HorizontalOptions="CenterAndExpand" />
<Button Text="back"
x:Name="Back_Button"
VerticalOptions="CenterAndExpand"
HorizontalOptions="CenterAndExpand" />
<Button Text="Modal"
x:Name="Modal_Button"
VerticalOptions="CenterAndExpand"
HorizontalOptions="CenterAndExpand" />
</StackLayout>
</ContentPage.Content>
</ContentPage>
using Xamarin.Forms;
using Xamarin.Forms.Xaml;
namespace pav.StackNavigation.Views
{
[XamlCompilation(XamlCompilationOptions.Compile)]
public partial class ModalPage : ContentPage {
public ModalPage () {
InitializeComponent ();
Back_Button.Clicked += async (s,e)=> await this.Navigation.PopModalAsync();
Modal_Button.Clicked += async (s, e) => await this.Navigation.PushModalAsync(new ModalPage());
}
}
}
if you take a look at the modal page you'll notice that that normal header back button is not present
however most devices have a dedicated back button which will pop the modal off the modal stack just the way it should, to block this behavior you can override the OnBackButtonPressed function.
using Xamarin.Forms;
using Xamarin.Forms.Xaml;
namespace pav.StackNavigation.Views
{
[XamlCompilation(XamlCompilationOptions.Compile)]
public partial class ModalPage : ContentPage {
public ModalPage () {
InitializeComponent ();
Back_Button.Clicked += async (s,e)=> await this.Navigation.PopModalAsync();
Modal_Button.Clicked += async (s, e) => await this.Navigation.PushModalAsync(new ModalPage());
Second_Button.Clicked += async (s, e) => await this.Navigation.PushAsync(new SecondPage());
}
protected override bool OnBackButtonPressed() {
return true; // block back button
return false; // pop current modal
}
}
}
now if you try to push to the normal stack while on a Modal stack you'll get an exception
which is probably a good thing since navigating to a normal page from a modal would be ridiculous.
Tuesday, 22 January 2019
Tabbed Navigation pattern
Another navigation is the tabbed navigation, when you want to jump from any point in your application to any other point in your application this is an effective pattern, however the number of visible tabs is limited and thus this is really only appropriate if you use four tabs for mobile devices.
to get started let's create four pages in a views folder in our solution.

With our four page created lets load up some arrows for our android project


Put them in the resources\drawable folder of our android project

with that done, let's configure our four tab pages in our views folder. just open up each one and make the following changes to the xaml.
For each page give them a descriptive title and and icon, if you want you can change the content as well just to be a little more descriptive on each page
to initialize the tabbed navigation pattern you have to open up your MainPage.xaml and change it's root from content page to tabbed page like so,
then open up the code behind and change it's inheritance type to TabbedPage, also add each of our created pages from our view model to the children collection.
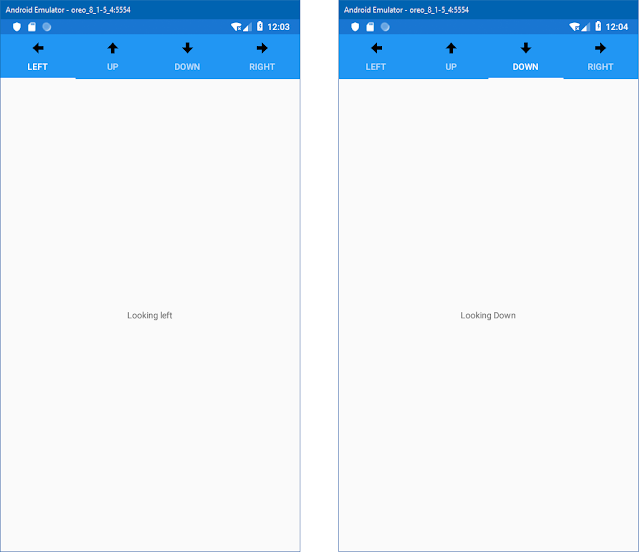
now with that done run your application and you should see something like the following.
Android:
Windows:

now if you prefer you can add all of your pages in the Xaml instead of the codebehind, but modifying the Children collection at that point can prove to be rather challenging (if possible).
You may have noticed that we also styled our navigation bar, now if for android you wanted to glue your tab menu to the bottom of the screen instead of the top you'd have to load the android namespace which would expose the ToolbarPlacement field.
One caveat is that when using the Tabbed navigation pattern out of the box the back button is not supported in app, meaning that if you hit the back button you will simply get the native action of moving back in the app stack, minimizing your application
to get started let's create four pages in a views folder in our solution.

With our four page created lets load up some arrows for our android project
Put them in the resources\drawable folder of our android project
with that done, let's configure our four tab pages in our views folder. just open up each one and make the following changes to the xaml.
<?xml
version="1.0" encoding="utf-8" ?>
<ContentPage xmlns="http://xamarin.com/schemas/2014/forms"
xmlns:x="http://schemas.microsoft.com/winfx/2009/xaml"
x:Class="pav.TabbedNavigation.Views.LeftPage"
Title="Left" Icon="arrowLeft.png">
<ContentPage.Content>
<StackLayout>
<Label Text="Looking
left"
VerticalOptions="CenterAndExpand"
HorizontalOptions="CenterAndExpand" />
</StackLayout>
</ContentPage.Content>
</ContentPage>
For each page give them a descriptive title and and icon, if you want you can change the content as well just to be a little more descriptive on each page
to initialize the tabbed navigation pattern you have to open up your MainPage.xaml and change it's root from content page to tabbed page like so,
<?xml
version="1.0" encoding="utf-8" ?>
<TabbedPage xmlns="http://xamarin.com/schemas/2014/forms"
xmlns:x="http://schemas.microsoft.com/winfx/2009/xaml"
x:Class="pav.TabbedNavigation.MainPage"
/>
using Xamarin.Forms;
using pav.TabbedNavigation.Views;
namespace pav.TabbedNavigation
{
public partial class MainPage : TabbedPage
{
public MainPage()
{
InitializeComponent();
this.Children.Add(new LeftPage());
this.Children.Add(new UpPage());
this.Children.Add(new DownPage());
this.Children.Add(new RightPage());
}
}
}
Android:

Windows:

now if you prefer you can add all of your pages in the Xaml instead of the codebehind, but modifying the Children collection at that point can prove to be rather challenging (if possible).
<?xml
version="1.0" encoding="utf-8" ?>
<TabbedPage xmlns="http://xamarin.com/schemas/2014/forms"
xmlns:x="http://schemas.microsoft.com/winfx/2009/xaml"
x:Class="pav.TabbedNavigation.MainPage"
xmlns:views="clr-namespace:pav.TabbedNavigation.Views"
BackgroundColor="LightSalmon"
BarBackgroundColor="Maroon"
BarTextColor="White">
<TabbedPage.Children>
<views:LeftPage Title="Left" Icon="arrowLeft.png"/>
<views:UpPage Title="Up" Icon="arrowUp.png"/>
<views:DownPage Title="Down" Icon="arrowDown.png"/>
<views:RightPage Title="Right" Icon="arrowRight.png"/>
</TabbedPage.Children>
</TabbedPage>
<?xml
version="1.0" encoding="utf-8" ?>
<TabbedPage xmlns="http://xamarin.com/schemas/2014/forms"
xmlns:x="http://schemas.microsoft.com/winfx/2009/xaml"
x:Class="pav.TabbedNavigation.MainPage"
xmlns:views="clr-namespace:pav.TabbedNavigation.Views"
BackgroundColor="LightSalmon"
BarBackgroundColor="Maroon"
xmlns:android="clr-namespace:Xamarin.Forms.PlatformConfiguration.AndroidSpecific;assembly=Xamarin.Forms.Core"
android:TabbedPage.ToolbarPlacement="Bottom"
BarTextColor="White">
<TabbedPage.Children>
<views:LeftPage Title="Left" Icon="arrowLeft.png"/>
<views:UpPage Title="Up" Icon="arrowUp.png"/>
<views:DownPage Title="Down" Icon="arrowDown.png"/>
<views:RightPage Title="Right" Icon="arrowRight.png"/>
</TabbedPage.Children>
</TabbedPage>
Monday, 21 January 2019
Stack Navigation Pattern
There are several ways in which we transition from view to view within a mobile application and often times we leverage one or more of them, here we'll dive into the Stack Navigation Pattern
The stack pattern is a fairly straightforward pattern where pages are stacked on top of each other, each page would have some sort of back button that would in turn let you pop the current page off the stack to return back to the previous page

What this means is that the application holds the current page as well as all previous pages in memory, and then releases each page from memory once it's popped off the stack.
To use the stack pattern we first need to open our App.xaml.cs file

Once you have the open you'll need to instantiate an instance of the navigation page and pass in an instance of your apps root page as a parameter.
This will allow us to leverage the stack navigation pattern with minimal effort.
next lets' create a second "Content Page"

this will give us a page to push onto and pop off our navigation stack. Now let's open up our Main Page and add a Push Button.
Now that we have a push button, lets open up our CodeBehind and add an event receiver to push our SecondPage.xaml onto the navigation stack

The stack pattern is a fairly straightforward pattern where pages are stacked on top of each other, each page would have some sort of back button that would in turn let you pop the current page off the stack to return back to the previous page
What this means is that the application holds the current page as well as all previous pages in memory, and then releases each page from memory once it's popped off the stack.
To use the stack pattern we first need to open our App.xaml.cs file
Once you have the open you'll need to instantiate an instance of the navigation page and pass in an instance of your apps root page as a parameter.
using pav.StackNavigation.Views;
using Xamarin.Forms;
using Xamarin.Forms.Xaml;
[assembly:
XamlCompilation(XamlCompilationOptions.Compile)]
namespace pav.StackNavigation
{
public partial class App : Application
{
public App()
{
InitializeComponent();
this.MainPage = new
NavigationPage(new
MainPage());
}
protected override void
OnStart() { /* Handle when your app starts*/ }
protected override void
OnSleep() { /* Handle when your app sleeps*/ }
protected override void
OnResume() { /* Handle when your app resumes*/ }
}
}
This will allow us to leverage the stack navigation pattern with minimal effort.
next lets' create a second "Content Page"

this will give us a page to push onto and pop off our navigation stack. Now let's open up our Main Page and add a Push Button.
<?xml
version="1.0" encoding="utf-8" ?>
<ContentPage xmlns="http://xamarin.com/schemas/2014/forms"
xmlns:x="http://schemas.microsoft.com/winfx/2009/xaml"
x:Class="pav.StackNavigation.Views.MainPage">
<StackLayout>
<!--label-->
<Label Text="Welcome
to Xamarin.Forms!"
HorizontalOptions="Center"
VerticalOptions="CenterAndExpand"
/>
<!--Push
Button-->
<Button x:Name="Push_Button"
Text="Push
Page"
HorizontalOptions="Center"
VerticalOptions="CenterAndExpand"
/>
</StackLayout>
</ContentPage>
using Xamarin.Forms;
namespace pav.StackNavigation.Views
{
public partial class MainPage : ContentPage
{
public MainPage()
{
InitializeComponent();
Push_Button.Clicked += async (s, e) => await this.Navigation.PushAsync(new SecondPage());
}
}
}
Our main page's navigation object is auto-magically wired up to leverage the use of the Navigation stack using dependency injection under the hood.
Next let's open up our Second page and add a pop button
<?xml
version="1.0" encoding="utf-8" ?>
<ContentPage xmlns="http://xamarin.com/schemas/2014/forms"
xmlns:x="http://schemas.microsoft.com/winfx/2009/xaml"
x:Class="pav.StackNavigation.Views.SecondPage">
<ContentPage.Content>
<StackLayout>
<!--Label-->
<Label Text="This
is the second page"
VerticalOptions="CenterAndExpand"
HorizontalOptions="CenterAndExpand" />
<!--Pop
Button-->
<Button x:Name="Pop_Button"
Text="Pop this
page"
VerticalOptions="CenterAndExpand"
HorizontalOptions="CenterAndExpand" />
</StackLayout>
</ContentPage.Content>
</ContentPage>
now that we have our pop button let's wire it up in the codebehind.
using Xamarin.Forms;
using Xamarin.Forms.Xaml;
namespace pav.StackNavigation.Views
{
[XamlCompilation(XamlCompilationOptions.Compile)]
public partial class SecondPage : ContentPage
{
public SecondPage ()
{
InitializeComponent ();
Pop_Button.Clicked += async (s,e) => await this.Navigation.PopAsync();
}
}
}
and that's it we're now using a stack navigation with minimal effort.
Navigation bar Customization
To modify the look and feel of the navigation bar we have to go back to our app.xaml.cs page.
using pav.StackNavigation.Views;
using Xamarin.Forms;
using Xamarin.Forms.Xaml;
[assembly:
XamlCompilation(XamlCompilationOptions.Compile)]
namespace pav.StackNavigation
{
public partial class App : Application
{
public App()
{
InitializeComponent();
this.MainPage = new
NavigationPage(new
MainPage()) {
BarBackgroundColor =
Color.Maroon,
BarTextColor = new Color(256, 256, 256),
BackgroundColor = new Color(256, 0, 0, .2)
};
}
protected override void
OnStart() { /* Handle when your app starts*/ }
protected override void
OnSleep() { /* Handle when your app sleeps*/ }
protected override void
OnResume() { /* Handle when your app resumes*/ }
}
}
with the above modifications made our app we see the following changes:
now these changes are consistent throughout our entire navigation model, so no matter where we are in our navigation stack we'll have a consistent theme.
You may have noticed that in the above our navigation bar has a page title, this can be accomplished declarative-ly in xaml or programatically in the code-behind
<?xml
version="1.0" encoding="utf-8" ?>
<ContentPage xmlns="http://xamarin.com/schemas/2014/forms"
xmlns:x="http://schemas.microsoft.com/winfx/2009/xaml"
Title="Home"
x:Class="pav.StackNavigation.Views.MainPage">
<StackLayout>
<!--label-->
<Label Text="Welcome
to Xamarin.Forms!"
HorizontalOptions="Center"
VerticalOptions="CenterAndExpand"
/>
<!--Push
Button-->
<Button x:Name="Push_Button"
Text="Push
Page"
HorizontalOptions="Center"
VerticalOptions="CenterAndExpand"
/>
</StackLayout>
</ContentPage>
Finally we can override a back button being pressed, generally we'd never want to do this because it could lead to confusion, with the user thinking that your app has frozen or isn't working correctly because it breaks an established paradigm, but with every rule there's always that one exception, anyway to do this you'd simple override the OnBackButtonPressed function.
using Xamarin.Forms;
using Xamarin.Forms.Xaml;
namespace pav.StackNavigation.Views
{
[XamlCompilation(XamlCompilationOptions.Compile)]
public partial class SecondPage : ContentPage
{
public SecondPage()
{
InitializeComponent();
Pop_Button.Clicked += async (s, e) => await this.Navigation.PopAsync();
NavigationPage.SetHasBackButton(this, false);
}
protected override bool
OnBackButtonPressed()
{
return true; // block back button
return false; // normal back button behavoir
}
}
}
with overriding the OnBackButtonPressed behavior we disabled the back button functionality and in the constructor we hid the virtual back button, in this situation we have to handle poping our page off our navigation stack ourselves, which we previously did in the Pop_button's event handler.
Subscribe to:
Posts (Atom)