When it comes to data access, my preferred approach is to use a dotnet core minimal API; for me this is the ideal middle man between your data and your user interface, I like it because it's simple to set up and simple to understand. Though it doesn't come with all of the complexity of a traditional MVC api. it also doesn't come with all of the extra features of its more 'complex' or 'advanced' (depending on how you look at it) counter part.
That said let's get started, open your terminal and navigate to your desired parent directory.
Execute the following commands:
dotnet new web -o pav.mapi.example --use-program-main
followed by
code pav.mapi.example
The first command says create a web project with the name 'pav.mapi.example' and use the traditional public static main template for the program.cs pag. I do this because I'm old, and it's what I am use to.
The second line just instructs code to open up the pav.mapi.example folder in a new instance of MS Code, if you wanted to open it in the same instance you could throw on the -r option so your command would look like 'Code pav.mapi.example -r' and it would open in the current instance of MS code you have running.
Your app should look something like the above, let's start with the explorer, notice that you have two appsettings files, the way it works is dotnet always loads the 'Appsettings.json' file then it will load when appropriate the corresponding 'Appsettings.<environment>.json' file.
The $10 question is how to I specify which extra app settings file to use; well before we answer that, let's add an 'appsettings.Local.json' file; generally I like to have a version of everthing that I can run in a stand alone fashion, this way I can develop and test things in isolation without the need of an SQL database or a Cloud storage container, or docker.
In your 'appsettings.Local.json' file add a single entry "flatFileLocation": "Local" and you guessed it in your 'appsettings.Development.json' file add a single entry "flatFileLocation": "Dev", later on we may expand on this, but for now if we can start our application in one of these two modes that will be a win.
Now open up your Program.cs file
namespace pav.mapi.example;
public class Program
{
public static void Main(string[] args)
{
var builder = WebApplication.CreateBuilder(args);
var app = builder.Build();
app.MapGet("/", () => "Hello World!");
app.Run();
}
}
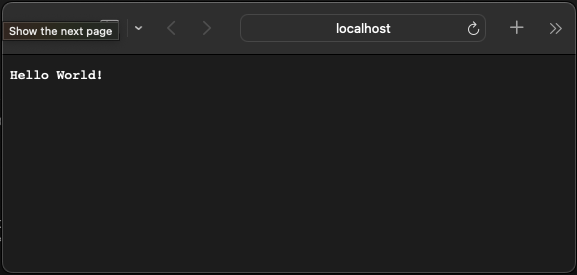
this is why I prefer the Minimal API project, because that's all there is to it, if we run our application now with "dotnet run" we'll see the following in our browser.
Let's try to swap that with our Appsettings flatFileLocation value, modify your Program.cs code to the following
namespace pav.mapi.example;
public class Program
{
public static void Main(string[] args)
{
var builder = WebApplication.CreateBuilder(args);
var app = builder.Build();
var flatFileLocation = builder.Configuration.GetValue<string>("flatFileLocation");
app.MapGet("/", () => flatFileLocation);
app.Run();
}
}
Notice that we added a 'FlatFileLockaiton' variable and assign it our value from our appsettings file, with this change if we stop our project with 'cntrl+c' and run it again with 'dotnet run', then reload our browser we'll get the following.
Which is pretty good we are reading from our 'appsettings' file, that's fine and dandy, but how do we specify the file we want to load, well for that we need to open our properties folder, and take a look at our 'launchSettings.json' file
{
"iisSettings": {
"windowsAuthentication": false,
"anonymousAuthentication": true,
"iisExpress": {
"applicationUrl": "http://localhost:1286",
"sslPort": 44327
}
},
"profiles": {
"http": {
"commandName": "Project",
"dotnetRunMessages": true,
"launchBrowser": true,
"applicationUrl": "http://localhost:5019",
"environmentVariables": {
"ASPNETCORE_ENVIRONMENT": "Development"
}
},
"https": {
"commandName": "Project",
"dotnetRunMessages": true,
"launchBrowser": true,
"applicationUrl": "https://localhost:7177;http://localhost:5019",
"environmentVariables": {
"ASPNETCORE_ENVIRONMENT": "Development"
}
},
"IIS Express": {
"commandName": "IISExpress",
"launchBrowser": true,
"environmentVariables": {
"ASPNETCORE_ENVIRONMENT": "Development"
}
}
}
}
take a closer look at the profiles sections, notice that under the environment variables we have an entry "ASPNETCORE_ENVIROMENT": "Development", now we could very well switch "Development" to "Local" and run our application that way
{
"iisSettings": {
"windowsAuthentication": false,
"anonymousAuthentication": true,
"iisExpress": {
"applicationUrl": "http://localhost:1286",
"sslPort": 44327
}
},
"profiles": {
"http": {
"commandName": "Project",
"dotnetRunMessages": true,
"launchBrowser": true,
"applicationUrl": "http://localhost:5019",
"environmentVariables": {
"ASPNETCORE_ENVIRONMENT": "Local" // Take a look here
}
},
"https": {
"commandName": "Project",
"dotnetRunMessages": true,
"launchBrowser": true,
"applicationUrl": "https://localhost:7177;http://localhost:5019",
"environmentVariables": {
"ASPNETCORE_ENVIRONMENT": "Development"
}
},
"IIS Express": {
"commandName": "IISExpress",
"launchBrowser": true,
"environmentVariables": {
"ASPNETCORE_ENVIRONMENT": "Development"
}
}
}
}
though better than having two versions of our application, not exactly the ideal solution, so let's add a profile specifically for our "Local" environment.
{
"iisSettings": {
"windowsAuthentication": false,
"anonymousAuthentication": true,
"iisExpress": {
"applicationUrl": "http://localhost:1286",
"sslPort": 44327
}
},
"profiles": {
"http": {
"commandName": "Project",
"dotnetRunMessages": true,
"launchBrowser": true,
"applicationUrl": "http://localhost:5020",
"environmentVariables": {
"ASPNETCORE_ENVIRONMENT": "Development"
}
},
"batman": {
"commandName": "Project",
"dotnetRunMessages": true,
"launchBrowser": true,
"applicationUrl": "http://localhost:5050",
"environmentVariables": {
"ASPNETCORE_ENVIRONMENT": "Local"
}
},
"https": {
"commandName": "Project",
"dotnetRunMessages": true,
"launchBrowser": true,
"applicationUrl": "https://localhost:7177;http://localhost:5019",
"environmentVariables": {
"ASPNETCORE_ENVIRONMENT": "Development"
}
},
"IIS Express": {
"commandName": "IISExpress",
"launchBrowser": true,
"environmentVariables": {
"ASPNETCORE_ENVIRONMENT": "Development"
}
}
}
}
I named the local launch settings profile batman on purpose, this is because I want to drive home that you are specifying the profile via the launch settings, which in turn choose the appsettings, not the other way around. I placed my custom environment second to drive home the fact that by default when you 'dotnet run', it's the first profile that is loaded if not specified. if you where to execute 'dotnet run', the browser would return "dev"
Now finally for the big reveal, if you want to specify the profile you simple type in
dotnet run -lp batman -lp stand for load profile
and that's it you now have an app that can be customised based on your appsettings json file.
One final note, go ahead and replace batman with local, just to remove the silliness from our example